

Appearance
User Guide for Seller Buyer Chat
ChatWhizz is now integrated with the Seller-Buyer Chat add-on of the Multivendor Marketplace App for Shopify.
Using this integration, you can display a live chat widget on your storefront. The customers can connect with the sellers on the runtime and get their queries resolved.
ChatWhizz Registration
How to get registered on ChatWhizz(Registration Process)
Read the blog to the end to learn how to register on ChatWhizz!
Installation at ChatWhizz End: Seller-Buyer Chat Add-on
To install the add-on, visit the Admin Panel of ChatWhizz. From here, click on the Add-ons menu from the left navigation bar. On this redirected page, you’ll have the add-on listed.

There are different plans to choose from. You can opt for a plan that is suitable for your business needs.

Installation at Multivendor Marketplace End: Seller-Buyer Chat Add-on
To install the add-on, visit Multivendor Marketplace Admin Panel > Hover over the three dots on the top right of the dashboard > Feature Apps. Next, enable the Seller-Buyer Chat add-on:

Once enabled, visit Configuration > Seller Buyer Chat:

Next, you need to configure the add-on by entering the following details:
- Email ID (Admin needs to mention marketplace admin email ID)
- Access Token
- Refresh Token

To get the access token and refresh token, visit ChatWhizz admin > installed add-ons > seller buyer chat > API details:

Here, you will have both the keys:

Once you'll save the details, you will get this success message on the screen:

NOTE:
If the admin enables Allow Sellers to Configure this Feature tab, then the seller will be able to see and configure the seller-buyer chat on the seller panel.

But if the admin disables "Allow Sellers to Configure this Feature" tab, then the seller will not be able to configure.

Auto-login to Seller-Buyer Chat
Sellers can now auto-login to the Chatwhizz panel from within their own seller panel.
They will find the option under Seller panel>> Configuration>>Seller-Buyer Chat>> Chat login

Code Instructions
Furthermore, visit Multivendor Admin Panel > Configuration > Instructions for Marketplace.
Here, you will have the code to add to the footer.liquid (or theme.liquid) template to display the chat box on frontend:
To show Chat History on the Storefront Customer Account page, you need to add the codes in main-account.liquid template

Code For Online Store 2.0
If you are using Online Store 2.0 (Example- Dawn), the codes to show the chatbox will remain the same.
Marketplace Seller Panel
On the marketplace seller panel, a seller needs to visit Configuration > Seller Buyer Chat:

Lastly, enable the option & save the changes:

Once done, an operator account will be created for the seller. The seller will receive an email regarding the same with login credentials.
Chat Box on Storefront
You will have the chat widget on the bottom of the page (depending on the configuration):

Customers can send their queries in this chat box:

The operators/sellers will monitor it from the ChatWhizz backend.

Note: Suppose a customer is on the product description page of product A. If the customer initiates the chat from this page, the seller selling product A will receive the message.
Similarly, the product page from where the chat starts will decide which seller will get the chat notification.
Now, in case the customer is on any other page that is not a product page, the chat notification will go to the admin. The admin needs to conduct the chat in that case.
Show chat history to customers
Now, you can show chat history to your customers on their account page. For this, firstly admin needs to regenerate the file from the storefront configuration
Multivendor marketplace admin panel>>Configuration>>Storefront configuration>> regenerate Seller buyer chat

A page named "Seller Buyer Chat" will be created on the Shopify pages section.
NOTE- Make sure to add the code to the respective liquid file on Shopify as mentioned above.
SELLER END
On the seller's end, a chat widget will appear in the dashboard like this.

NOTE- To show the chat widget on the seller dashboard make sure that seller-buyer chat is enabled for that particular seller.
Seller can accept/decline the chat and can create a ticket or end chat of an ongoing chat.
Enable UV desk addon on chatwhizz end for ticket creation.


On customer end
This is how it will look on the customer end


Auto Bot Response (Seller-Buyer Chat)
We have added a new feature in your seller-buyer chat — Auto Bot Response.
This feature allows your store to automatically reply to customer queries.
Whenever a customer visits your website and opens the chat, the bot will respond to product-related and order-related questions based on your store data.
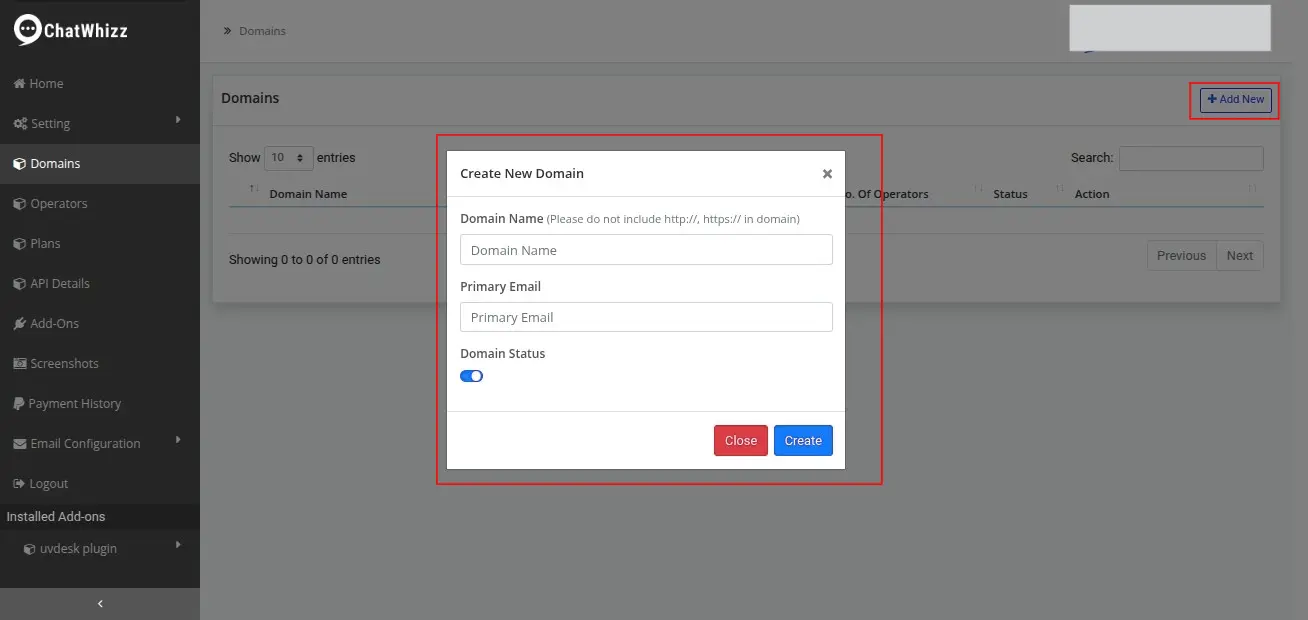
Add Your Domain
- Go to:
Chatwhizz Dashboard → Domain → Add New - Fill in the details:
- Domain Name → Enter your website URL (without https://)
- Email → Enter your email ID
- Click on Create
After this, your domain will be successfully added to the list.
Enable Auto Response
- After adding the domain, click on the Eye Icon next to it
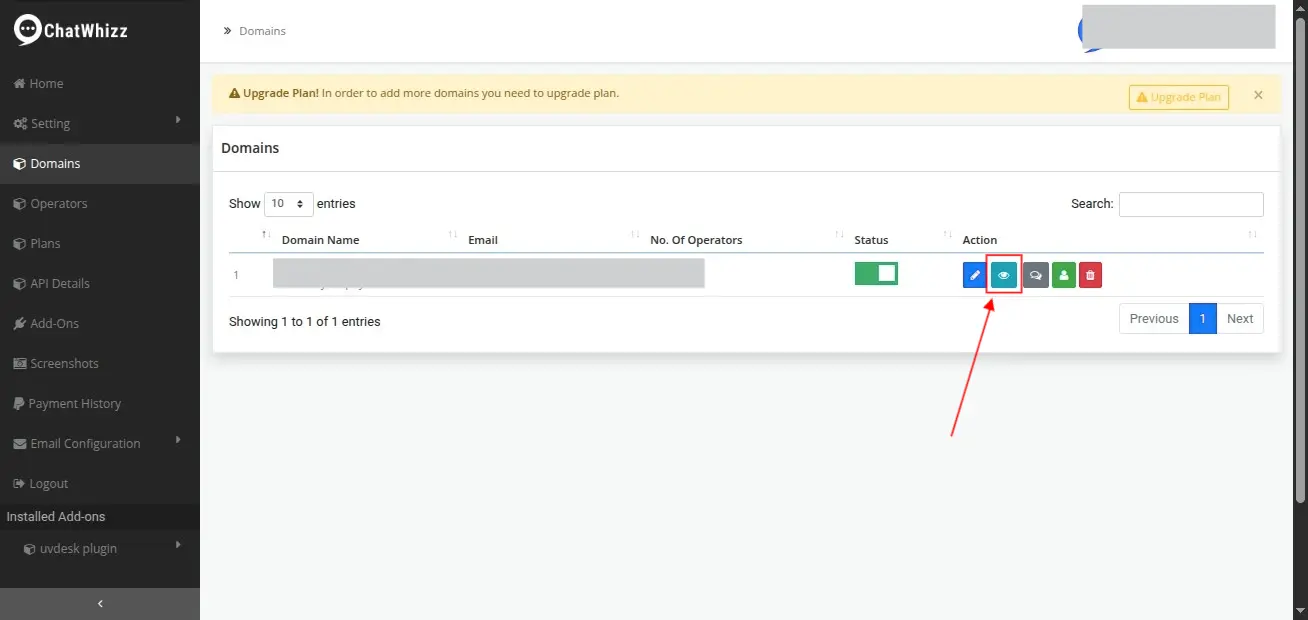
- Open General Configuration
- Find the option: Enable Auto Response
- Turn it ON
- You will see this message:
“Please configure the Auto Response section first, to ensure proper bot functionality.”
This means you now need to complete the setup.
- Click on Save
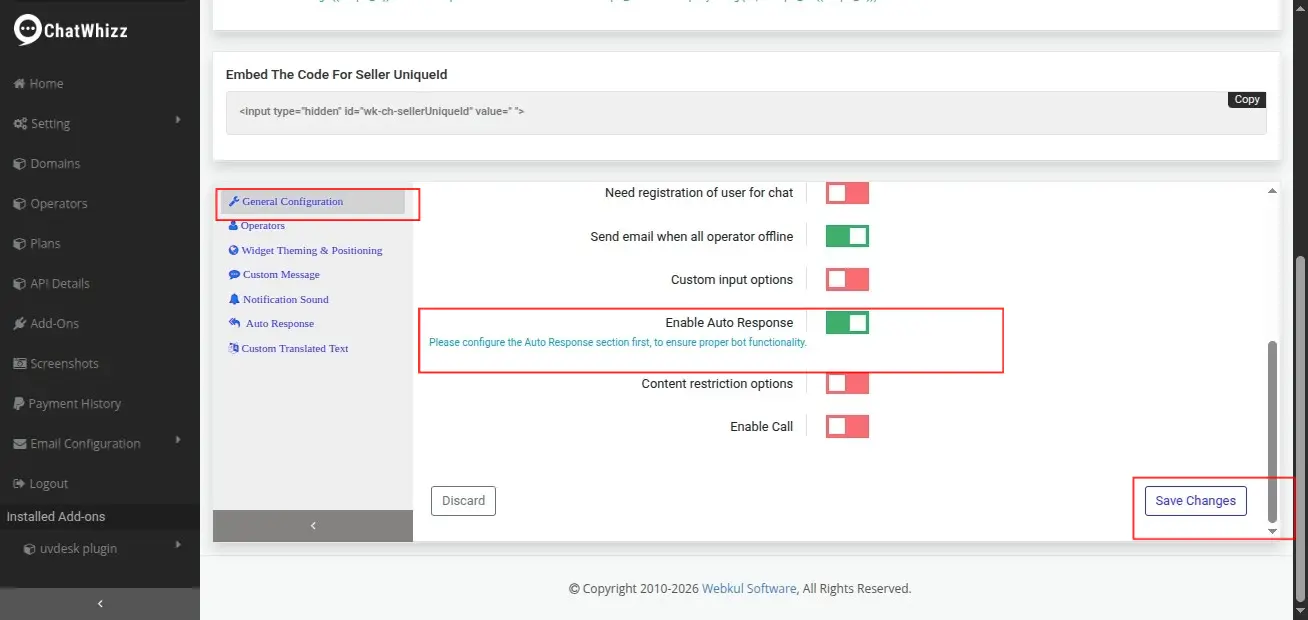
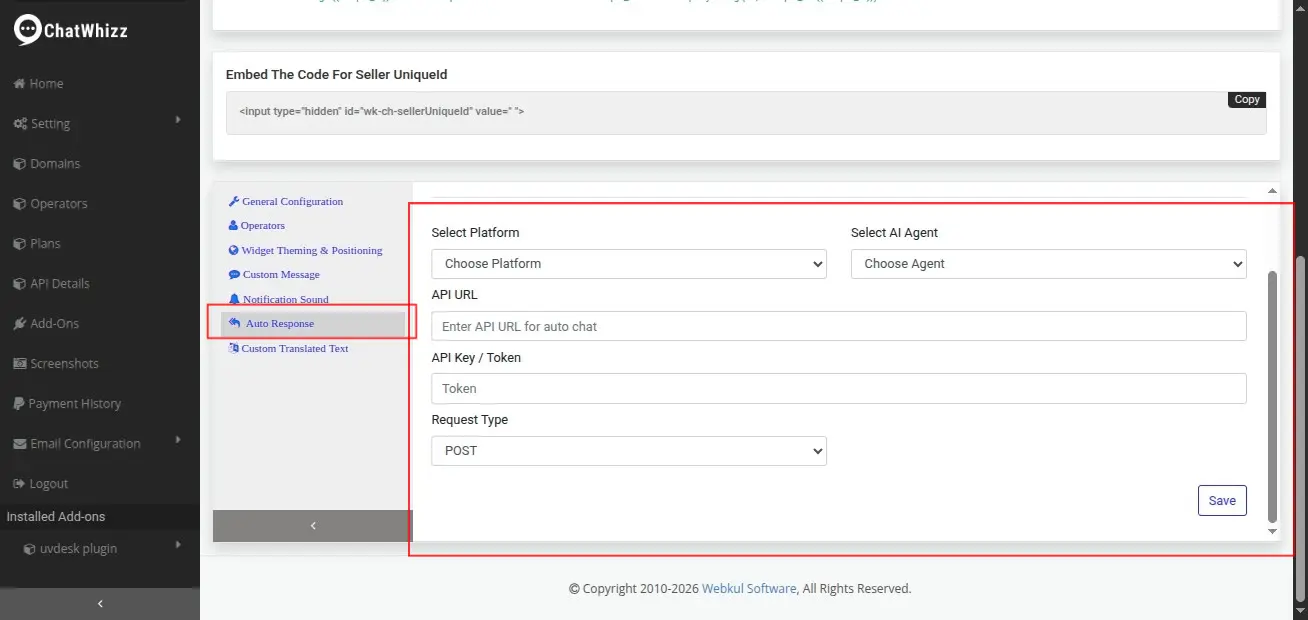
After saving, a new section “Auto Response” will appear.
Configure Auto Response (Very Important Step)
Go to the Auto Response section and fill all details carefully:
- Platform → Select Shopify
- AI Agent → Select ChatGPT
- API URL →
You must enter this exact URL (do not change anything):
https://api.openai.com/v1/chat/completions - API Key → Paste your OpenAI API Key here
- Response Type → Select POST
After filling all details, click on Save Changes
How to Get OpenAI API Key
This step is required for bot functionality.
- Go to: https://platform.openai.com/
- Create a new account or login
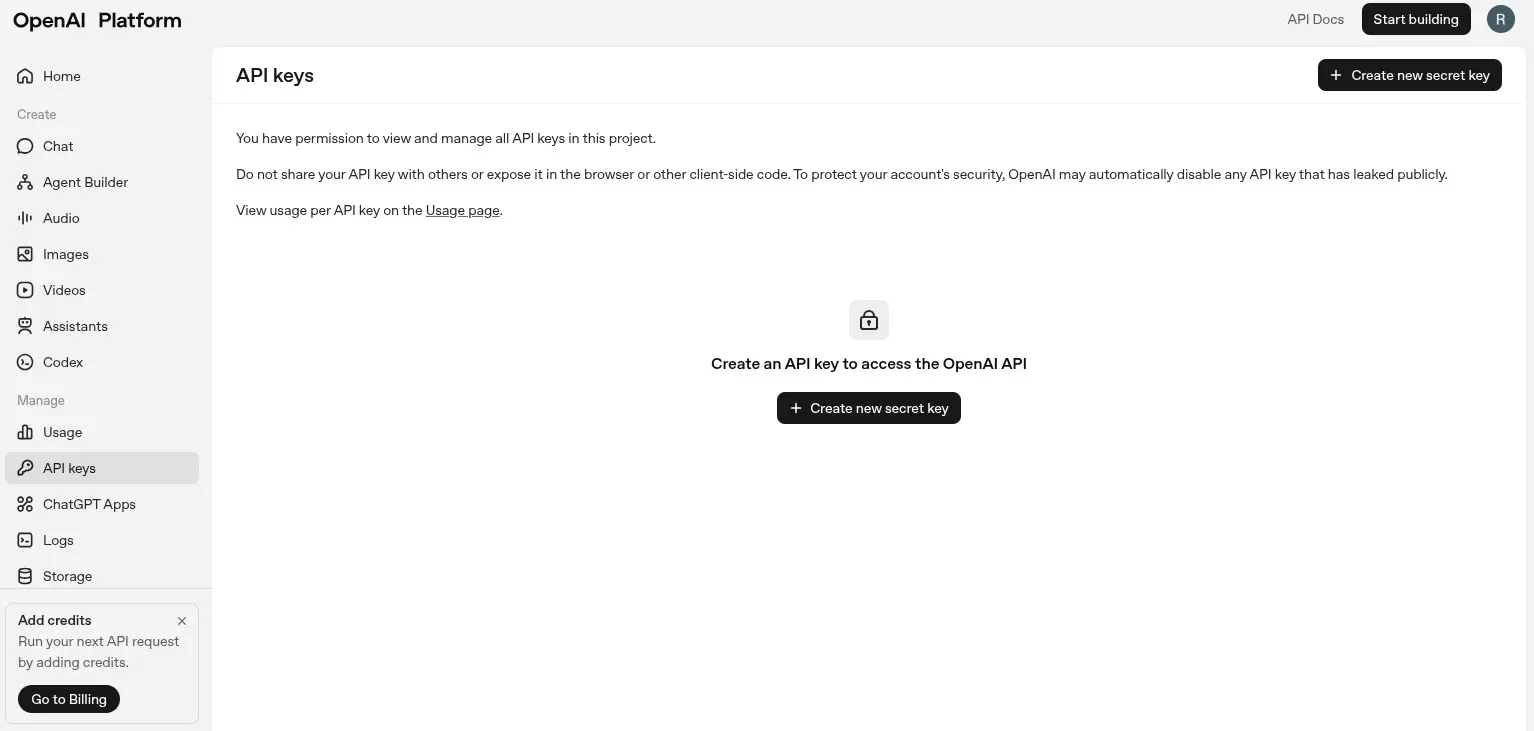
- Go to API Keys section
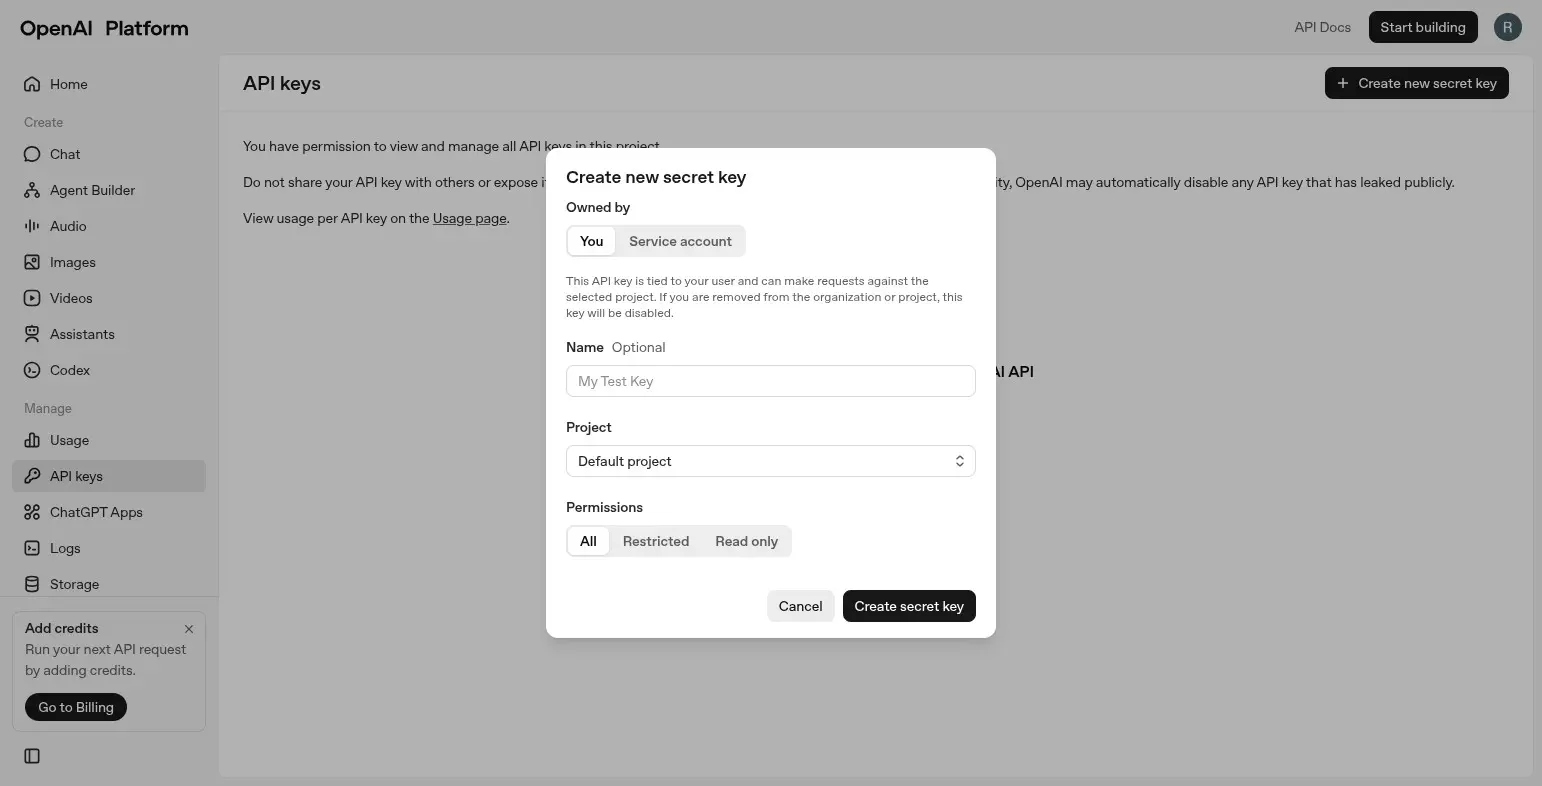
- Click on Create API Key
- Enter:
- Name
- Project
- Click on Create Secret Key
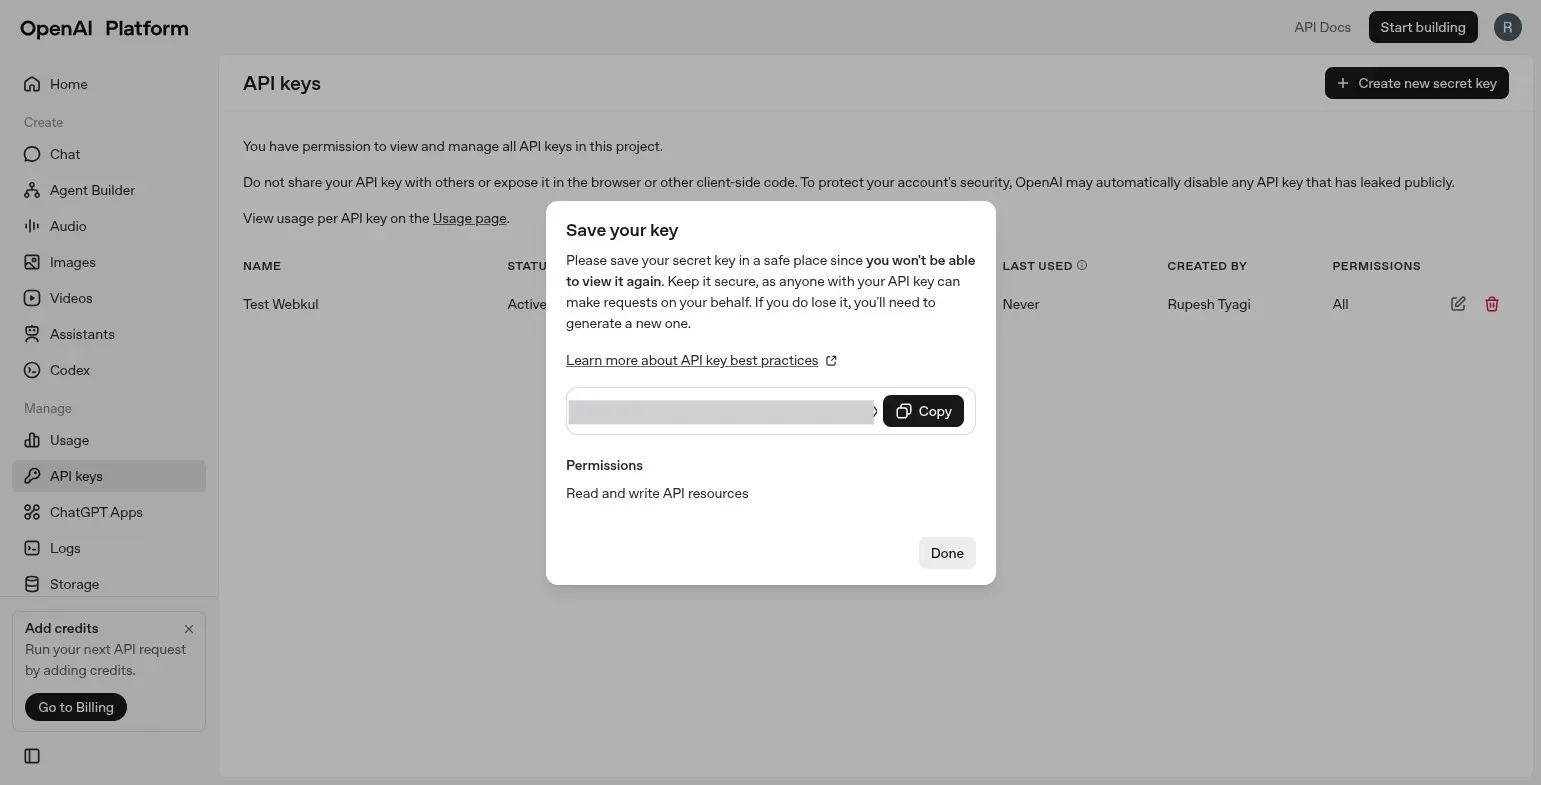
A key will be generated
Copy this key and paste it into Chatwhizz (API Key field)
Install the Chatwhizz live chat App in Shopify
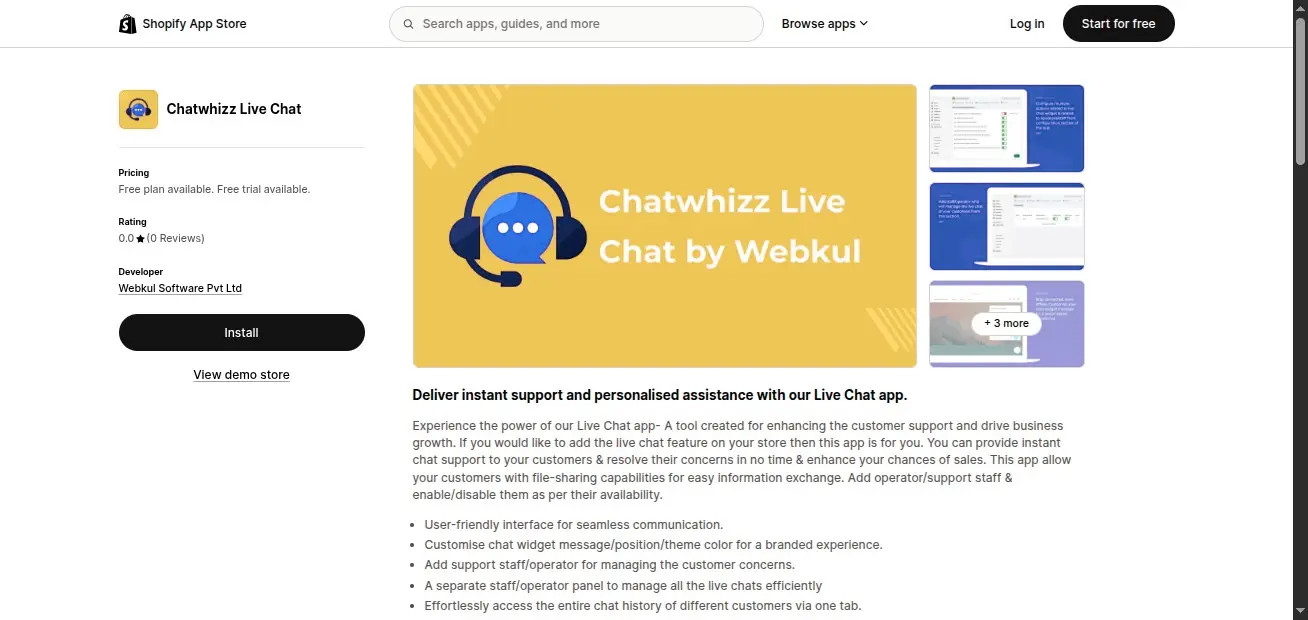
- Open Shopify App Store
- Search: Chatwhizz Live Chat
- Click on Install
This app is free, no extra payment required.
- After installation:
- You will see Choose Your Chat Mode
- Select Seller Buyer Chat
- Click Continue
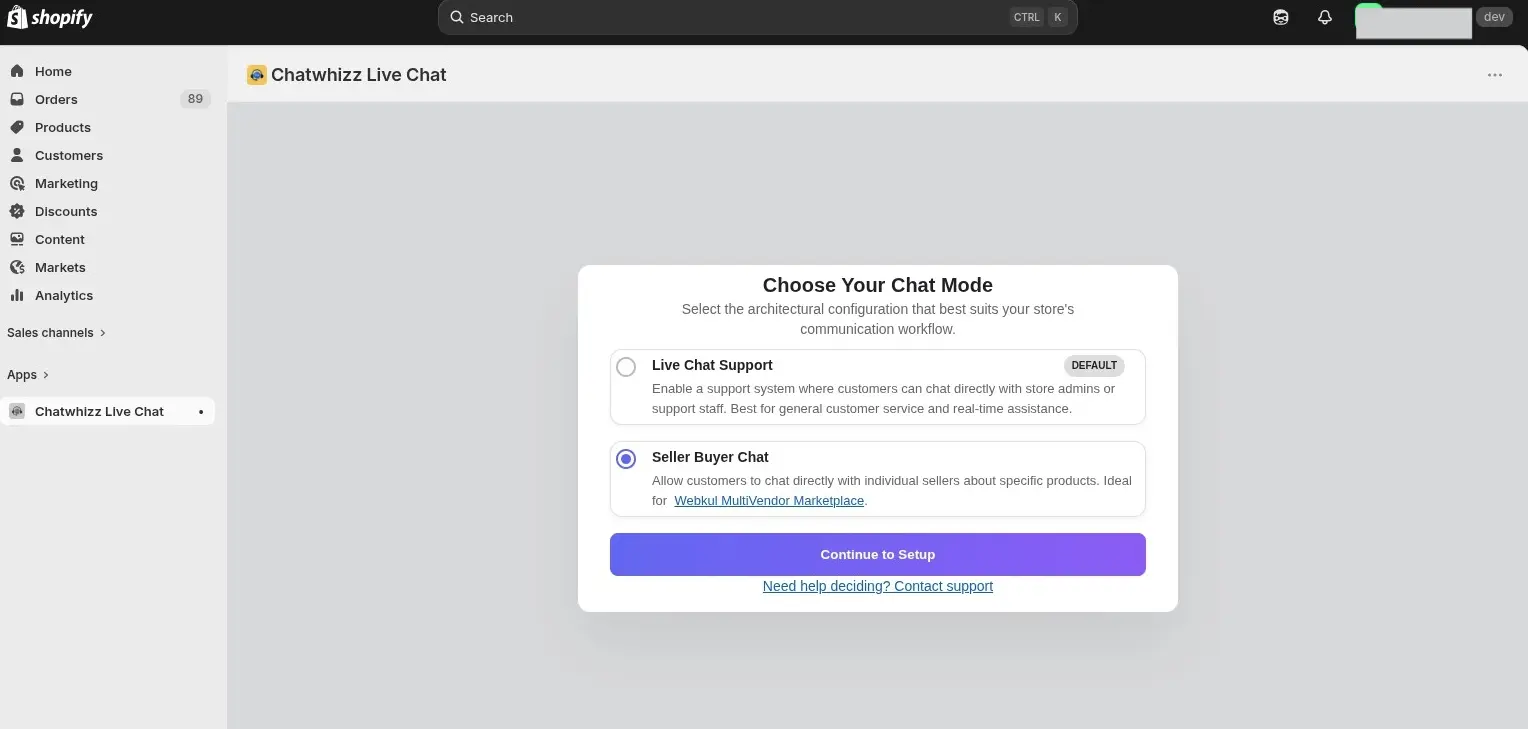
Once done, Auto Bot functionality will be activated.
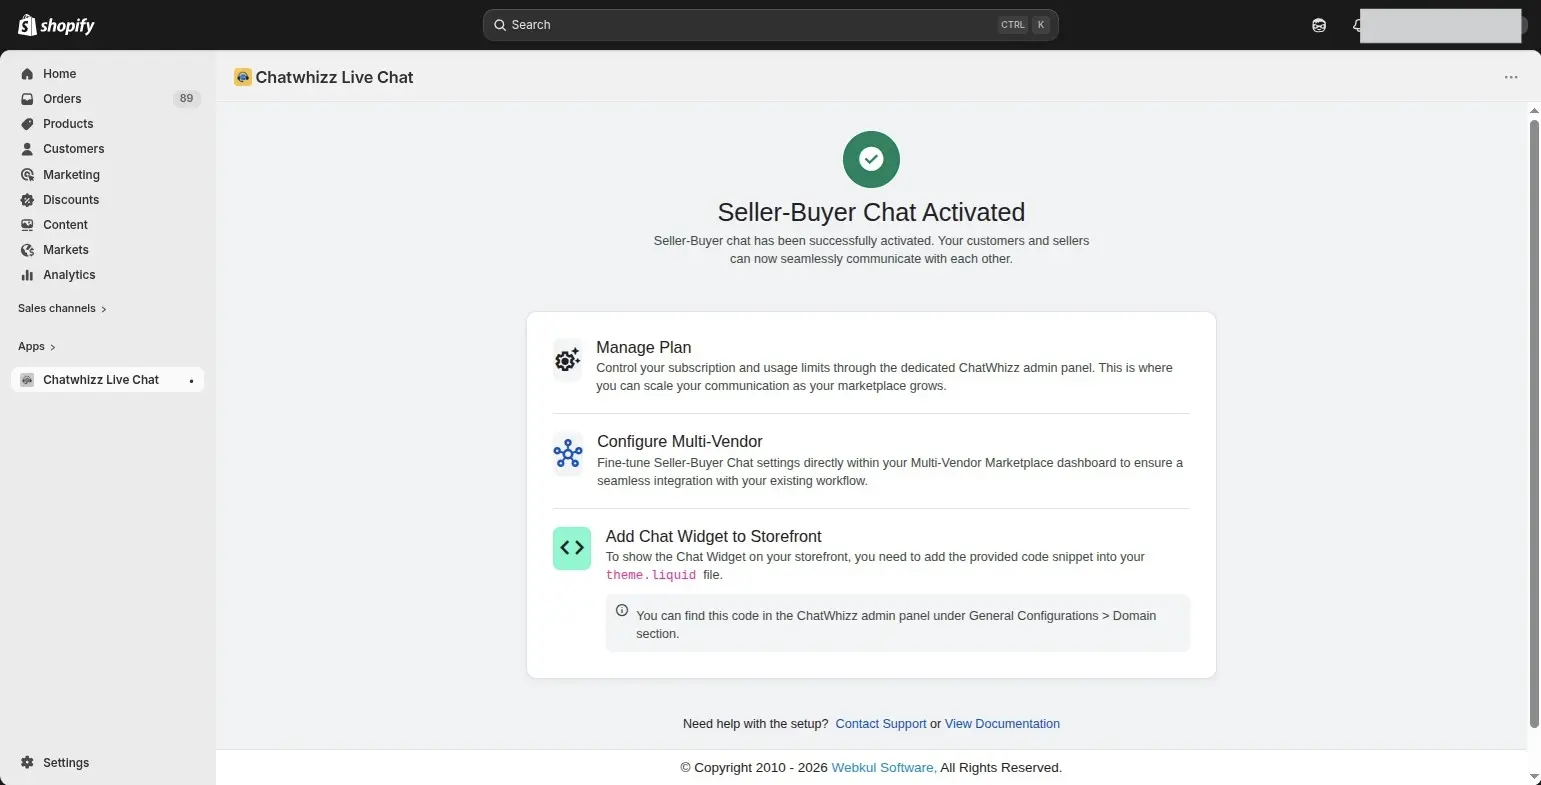
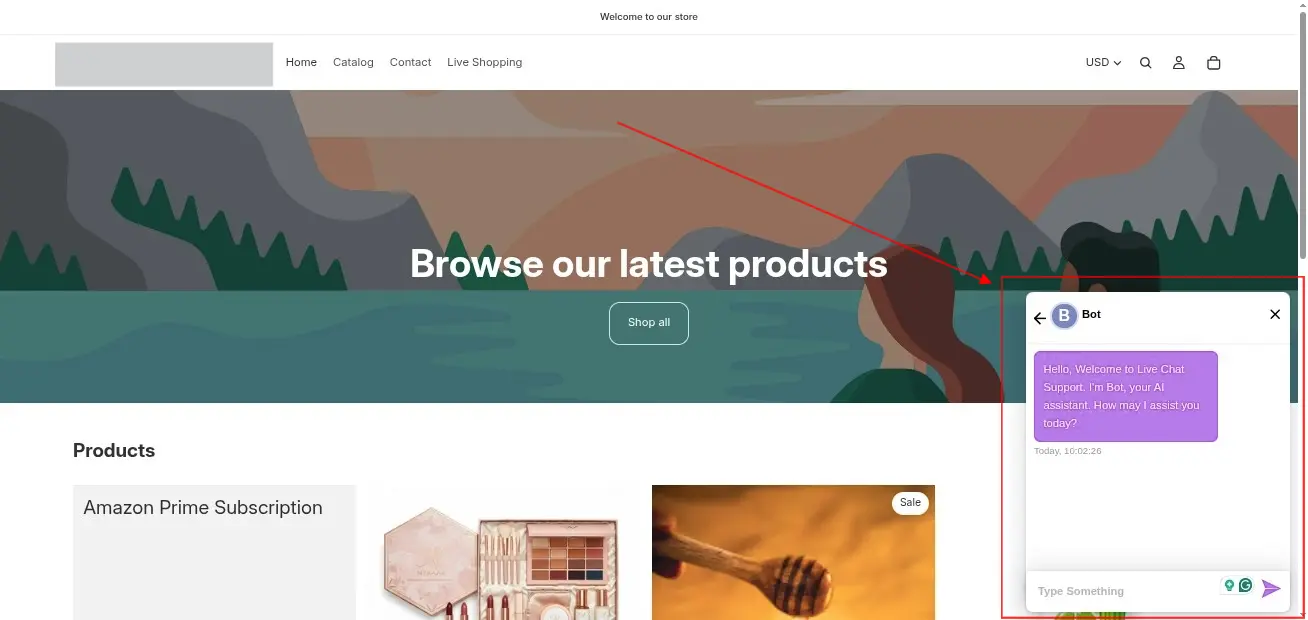
Frontend (What Customer Will See)
- A chat icon will appear on your website
- A default welcome message will be shown
Customers can:
- Ask product-related questions
- Ask order-related queries
Bot will automatically respond based on your store data
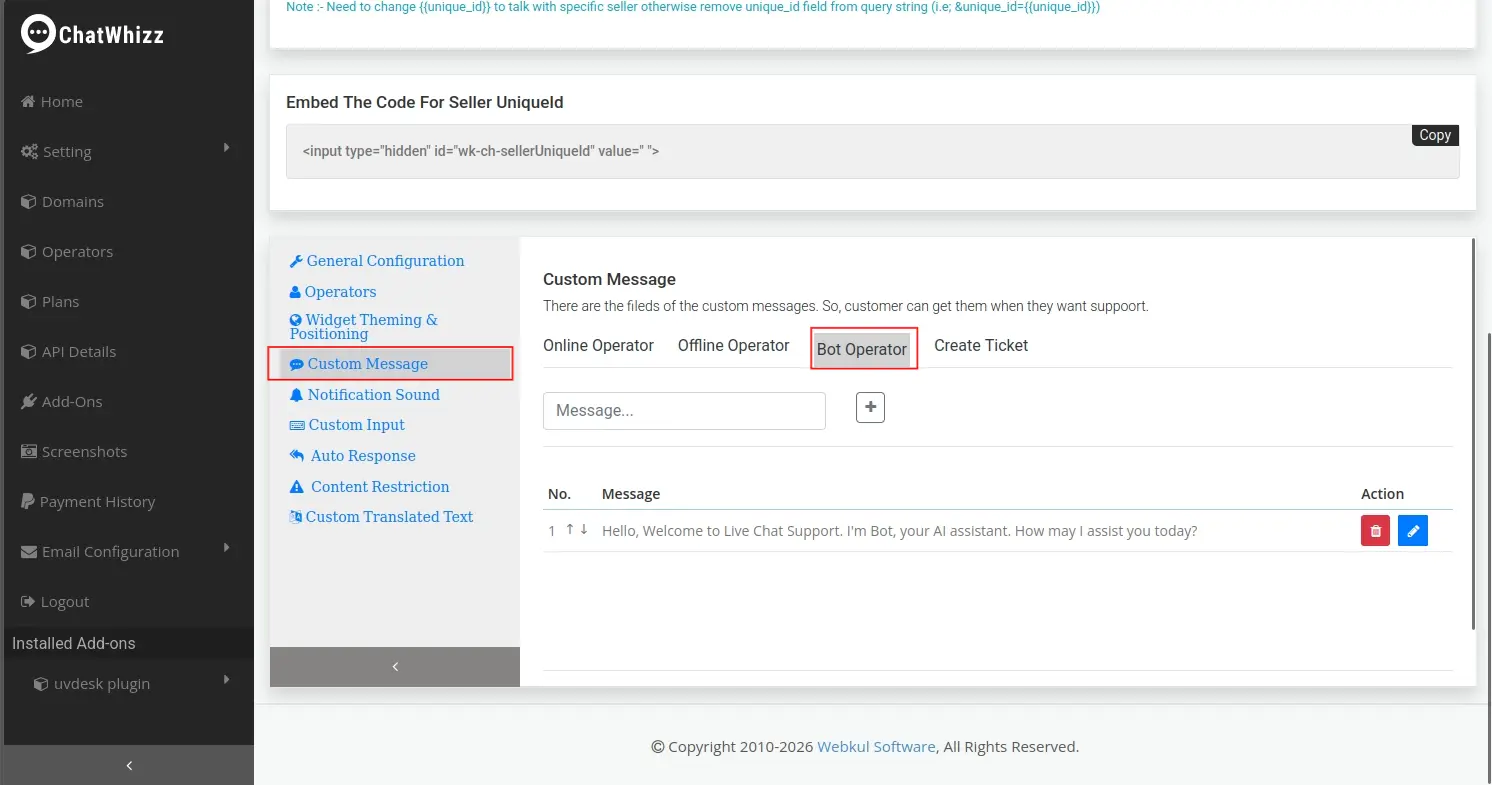
Edit Default Welcome Message
If you want to change the message shown to customers:
- Go to:
Chatwhizz Panel → Domain → Eye Icon - Open:
Custom Message → Bot Operator - Click on Edit
- Update the message as per your requirement and save
SCHEDULE DEMO
Click here to Schedule the demo of Multivendor marketplace App for Shopify