We keep on updating the Multivendor Marketplace app for Shopify to make it even more desirable. Bookmark this blog to check the configuration updates for the app!
Auto Fulfillment Reminder For Seller
You can now enable the tab to send fulfillment reminders to sellers automatically via the app. For this, visit the admin panel of the app>>Configuration>>Order Configuration and enable the tab.

Once you enable it, you can enter the number of days after which the system will send the fulfillment email to sellers.
Moreover, get the option to enter the no of days up to which you want to send the fulfillment email.
DISPLAY VENDOR LOCATION ON COLLECTION PAGE
Visit Multivendor Admin Panel > Configuration > Instructions for Marketplace, add the following code to the collection-template.liquid file:

This is how it will look on the storefront:

SELLER DELETE
The admin can now delete the sellers from the marketplace by visiting Multivendor Admin Panel > Sellers > Seller Listing:
[NOTE: Deleting a seller is a permanent action, meaning that once you delete a seller, no information can be recovered.](Note: Deleting a seller is permanent and cannot be undone. Once deleted, all seller information is irretrievably lost.)
So, in case you want to shut the seller's account but need to keep the information for future reference, you can simply disable them.

Clicking on Delete Seller will give you a pop-up like so. You can check-mark on the delete product option if you want to delete the seller's products from Shopify as well.

Seller Notification
Now, store admins can easily send notifications to sellers directly from the MVM admin panel. Follow these steps to add a new seller notification:
- Navigate to: MVM Admin Panel > Sellers > Seller Notification

- Click on the "Add Notification" button.

Enter the Title and Notification Message.
If you want to send this notification to specific sellers only, enable the "Specific Seller" setting and select their email IDs.
Click Submit to send the notification.

Additionally, you can now disable a notification when needed:
- Click on the three dots ("...") next to the notification.
- Select "Disable" and then click Update Status.


This feature ensures better communication between store admins and sellers, improving overall store management.
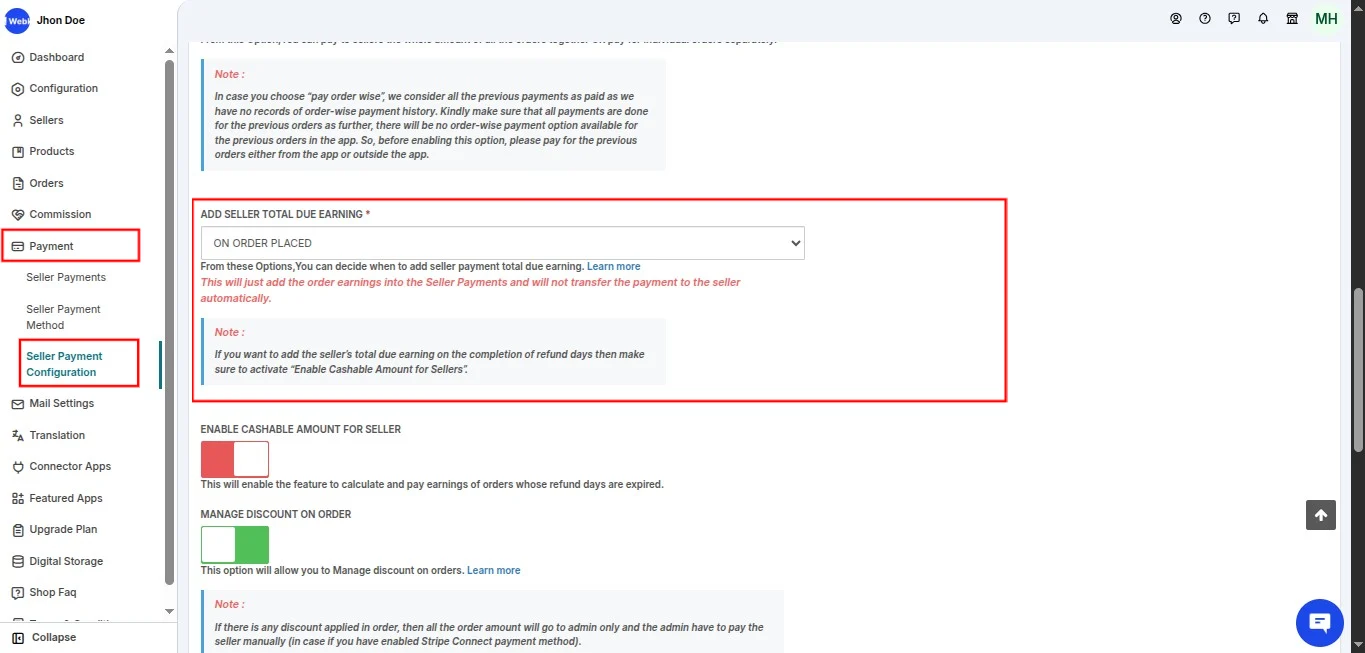
ADD SELLER TOTAL DUE EARNING
The admin can decide when to add seller payment total due earnings. Configure it by visiting Multivendor Admin Panel > Configuration > Payment Configuration. Refer to the screenshot given below.
You can update the total due for seller payment after the following events:
- Order placed
- Paid order
- Order delivered
- Refund days completed
Note: If you want to add the seller’s total due earning on the completion of refund days then make sure to activate “Enable Cashable Amount for Sellers” from the “Order Configuration” menu.
Important Note: Enabling this option, the payment won't go to the seller automatically. The app will update only the total earnings.
Display Total Due Amount on Seller Dashboard
Enabling the "ALLOW SELLER TO VIEW TOTAL DUE" configuration allows sellers to view the total due amount directly on their dashboard.
This feature quickly and clearly presents sellers with an overview of their financials, enhancing their ability to manage transactions effectively.

Here's how you can enable this setting:
- Navigate to the Configuration >> Sellers Configuration.
- Locate the "ALLOW SELLER TO VIEW TOTAL DUE" option.
- Enable this setting.
- Save the changes.

ACCEPT AND FULFILL ORDER
You can now choose whether you want your seller to accept and fulfill the order at the same time.
For this, visit Multivendor Marketplace Admin Panel > Configuration > Order Configuration > Enable this feature & save:

Make sure that 'Allow Seller To Accept Order' menu is Enable.
After that, the seller will get the order accept & fulfill option at one time.
Sellers need to visit Multivendor Marketplace Seller Panel > Orders > Order Listing > View Unfulfilled Order > On the following page, seller will get this option:

Clicking on the blue button, the seller will get a popup to accept the order:

As soon as the seller will accept the order, he will automatically get a fulfillment popup. Refer:

The seller needs to enter the required fields & complete the fulfillment step. This way the steps to order fulfillment reduces & you can save the time.
DISPLAY SELLER'S STORE LOGO CAROUSEL ON HOMEPAGE
You will now get an option to add a logo carousel to the home page of your store. For this, you need to follow the below-given steps:-
Go to the admin panel of the Multi-vendor app.
- Further, visit the Configuration.
- Click Instruction for Marketplace.
- Get the option to display the seller’s store logo carousel.
- Furthermore, click on the “Generate” button to generate liquid files on the Shopify end.
This will create a Seller Listing in the theme editor of your Shopify store.
Shopify backend>>Online Stores>>Theme>>Customize Theme>>Add Section>>Seller Listing appears (Sellers)>> Further, Add it to the Homepage.
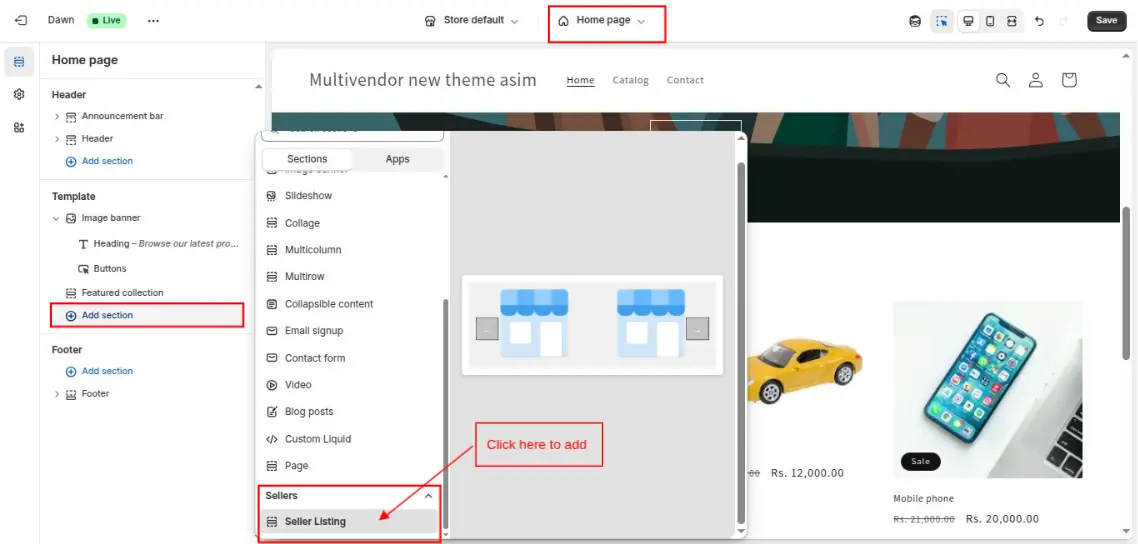
Additionally, all your sellers’ store logos will be showcased in the logo carousel on your homepage.

That’s all!
REGENERATE TEMPLATE FILES
When you install a featured app on your marketplace, its related template files are automatically created in the backend.
However, if these files are accidentally deleted, the app’s functionality may be disrupted.
Previously, to fix this, the store owner had to either manually recreate the files within the app or request us to regenerate them.
Now, the store owner/admin can do this on its own by visiting the following section of the MultiVendor app:
Multivendor Admin Panel > Configuration > StoreFront Configuration:
Furthermore, on this page, the admin will have all the featured apps he has enabled on his marketplace with a ‘Regenerate‘ button.

The Admin just needs to click on the Regenerate button to automatically recreate the files for the desired feature.
SELLER FEEDBACK CONFIGURATION
Now, the admin can configure the following options regarding the Seller Feedbacks:
Multivendor Admin Panel > Configuration > General Configuration
- BEFORE GIVING FEEDBACK CHECK WHETHER CUSTOMER LOGIN OR NOT
By enabling this feature, you can restrict customers to give feedback if they are not logged in to your store.
Note: In case this is enabled, you need to make the customer account mandatory from Shopify backend. Refer.
Before enabling this feature, add the following code to the end of page.mp_seller_profile.liquid file.
<div class="wk_cstm_email" data-cust="{{ customer.email }}"></div><div class="wk_cstm_name" data-cust="{{ customer.name }}"></div>
- BEFORE GIVING FEEDBACK CHECK WHETHER CUSTOMER HAD PURCHASED ATLEAST 1 PRODUCT OF THE SELLER.
By enabling this feature, you can restrict customers to give feedback if he is not a valid customer.

Moreover, the customers can edit the feedback given by them by visiting the 'All Reviews' section from the seller profile page. Refer to the screenshot given below:

Note that the customer needs to log in to the store to edit the review.
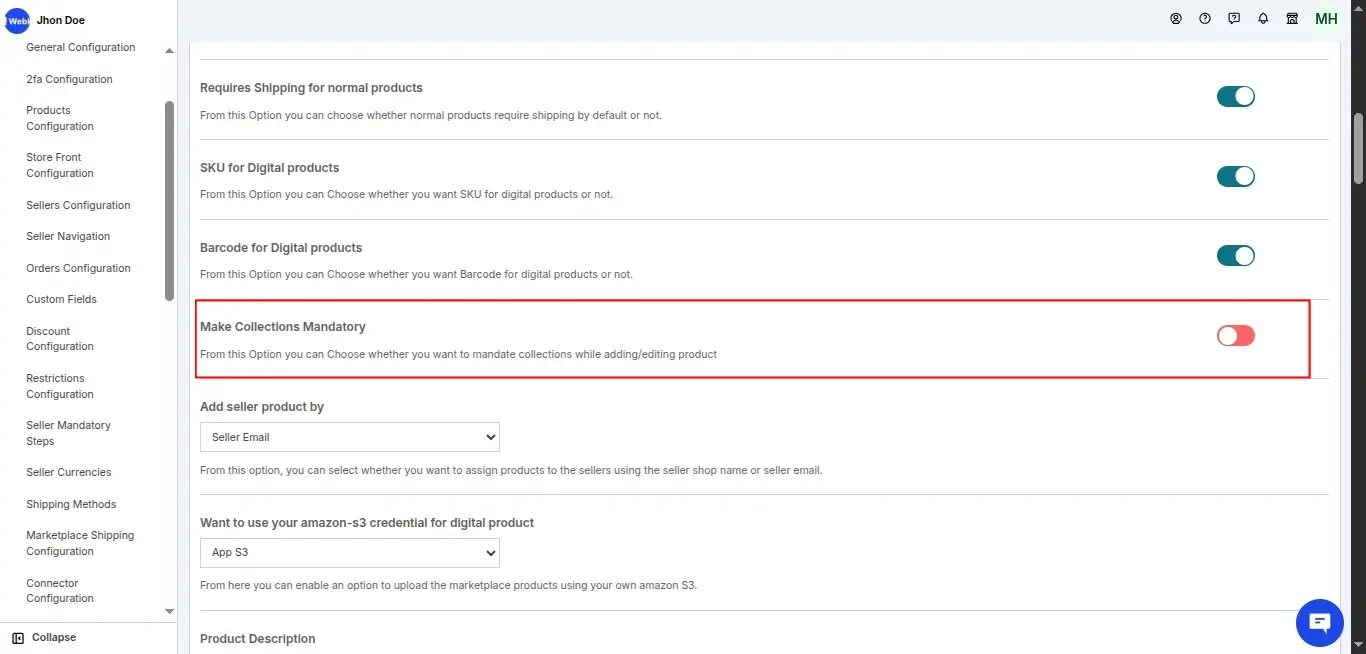
MAKE COLLECTION MANDATORY
With this setting in the product section of the configuration, you can enable/disable the make collection mandatory button,
In case enabled it will make sellers mandatorily choose the collection at the time of adding product.
Go to Configuration >>> Select Product Setting >>> Enable option of Make collection mandatory >>> Click on save.
ALLOW SELLERS TO VIEW CUSTOMER DETAILS
Allow Seller To View Customer Details
With this setting, admin can allow/disallow the seller to view customer details.
Allow Seller To View Customer Email
With this setting, admin can also allow/disallow the seller to view the customer email id.
Allow Seller To View Customer Contact Number
With this setting, admin can also allow/disallow the seller to view the customer contact number.

SSO (SINGLE SIGN-ON) FOR SELLER
If an admin has multiple Shopify stores and is using our MVM app on these different stores, they often have to go to each store individually to add sellers in MVM.
To simplify this process, we've introduced an option where admins can connect all their stores in one place. The seller signup page will display the stores they connect to.
This way, sellers can choose which of the admin's stores they want to list their products.
The Admin must enable "Single Sign-On" (SSO) in the Multivendor Marketplace App to use this feature.

In Order to connect the store, the admin must add the store name in the SSO configuration. Clicking on "SSO Config" will take the admin to a dedicated page to connect their store for seller sign-on.

To confirm the store connection, the admin should enter the verification code received after specifying the store they want to link. Once the verification is successful, the store will be connected.


The seller can also log in from one account to another account with just a simple click.

The option to select the Admin's store to sellers will display on the seller signup page as shown below:

DISPLAY TOTAL ORDER AMOUNT & TOTAL ORDER COMMISSION
Visiting the restriction setting of the configuration, the admin can now also enable/disable the display Total order amount & Total order commission on the dashboard.

PAYFAST PAYMENT GATEWAY INTRODUCED
The PayFast payment gateway is newly introduced as a payment mode between admin and seller.

C2C: CONVERT YOUR CUSTOMERS TO SELLERS
Take advantage of the new functionality of converting your customers into sellers with ease.
All you need to do is add the following code into the customer/account.liquid theme page to display the “Seller Portal” button on the customer’s account page.
To paste the below given, follow the below process:
<a class="btn btn--small wk\_c2c\_marketplace" target="\_blank" href="https://sp-seller.webkul.com/?p=c2c\_marketplace\_process&customer\_id={{customer.id}}&shop={{shop.permanent\_domain}}" style="display: none;float: right;">Seller Portal</a>
- Go To Themes.
- Click on Customize Theme button.
- Further, click on the Edit Code button.
- Select customer/account.liquid file from the templates.
- Paste the code.
- Click on save.
Once it is done, you will have to enable C2C Marketplace button from General Configuration >>> Activate this feature.

**The functionality of C2C Marketplace:-
**Enabling this feature, you can allow the buyers to convert into the sellers.
As soon as you enable this feature, you will have a few options to choose when you want to create customers:-
-At the time of sign up
-At the time of seller approval
-Don’t need to create customers.

If the 1st option “At the time of sign up” is enabled:-
The sellers will be added as a customer as soon as they get registered to the marketplace.
In case the 2nd option “At the time of seller approval” is enabled:-
If a seller registers on the marketplace, the 'Auto Approve Seller' tab should be disabled. This action will ensure that sellers are added as customers to the admin’s Shopify store
**Don’t need to create customers.
**Select this option if you don’t want to add the registered sellers as customers.
On the front end, customers will get a button name as seller portal to become a seller.

After clicking on the seller portal button it will redirect you to the terms and conditions page set by the store owner.

If the customer tick and click on submit tab it will redirect you to the seller portal but customer click on the cancel tab it will redirect to the previous page.

PAYPAL MASSPAY
Introducing Paypal Masspay where the seller will be paid automatically for the orders once they will mark the order as delivered.
If you enable this option, your seller will be paid via Paypal Masspay automatically only after they mark the order as delivered
Go to configuration >>> payment setting >>> Enable paypal masspay >>> SAVE.

HANDLING & TRANSACTION CHARGES
We have introduced Handling charges and Transaction charges on the Sales Price
i.e now after enabling the sales price feature from the configuration the Handling and Transaction charges as well.
Go to Configuration >>> Product Setting >>> Enable Sales Price.

Handling Charges: The total handling cost added to the product's base price during product creation.To enable this, check the box and click on save.
Transaction Charge: The total transaction fee added to the product’s base price.
1. Fixed – This indicates the total fixed amount to be added to the product base price.
2. Percentage – This indicates the total % amount to be added to the product base price.
The calculation for these happens like below:((Base price + commission) + handling fee) + transaction fee = sales price
calculation
((100$+ 10% commission)+ 10$handling) + (10%+$10)= sales price
For example:
((100$+ 10% commission)+ 10$handling) + (10%+$10)
=((110$)+ 10$handling)+ (10%+$10)
=$120 (10%+$10)
=$132 +10$
=$142
ZONE WISE SHIPPING
In this feature, Admin can create the zones and add countries in that zone, based on which the sellers will set prices.
Zone here can be any name given to a group by admin, in which admin adds up countries that will have the same range and prices.
This feature is for all those who never wanted to set the shipping country wise.
Please visit configuration >>> Shipping >>> And select Zone wise Shipping.
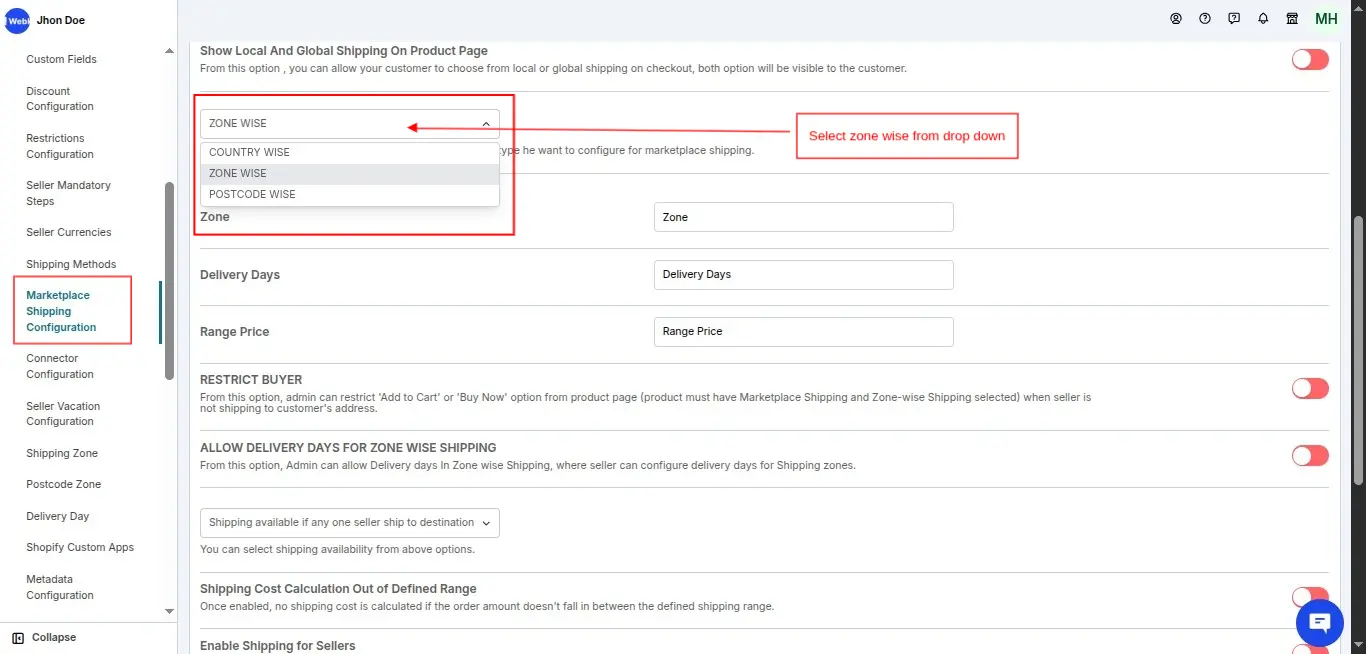
Then Shipping Zones Option will get added to your main menu.
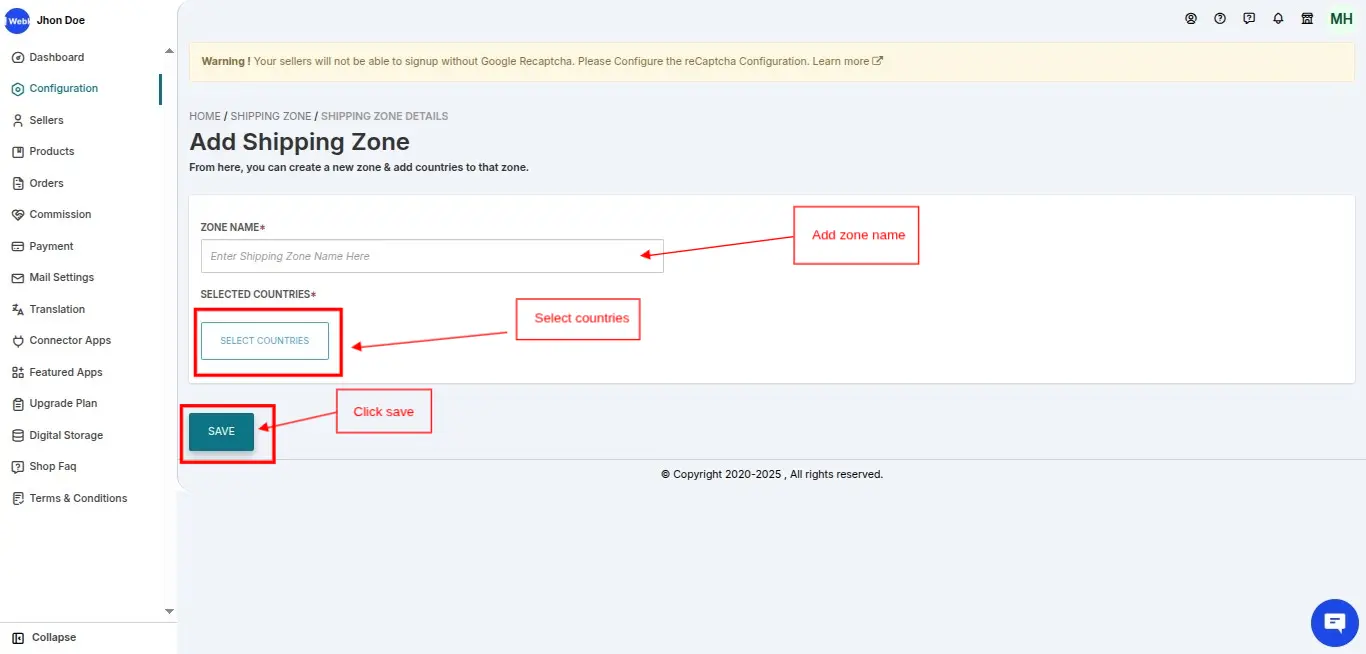
Click on Shipping zones and then click Add zones to add the shipping zones.

Clicking on Add zone, you will be redirected to the page where you will name the zone and add countries to it.
On the seller end:
Go to shipping Configuration and add ranges. Then click on the eye button to view the range and set the prices range-wise.

AUTO DISABLE PRODUCTS
Admin can now auto-disable the product after a certain duration. Yes, you read it right. With the feature of Auto disable Admin can set to disable a product after X days.
This X will be the number of days (value) added by admin. And it will be on the basis of:
-From Product added Date: This will be the X number of days counted from the date when the product was added.
OR
From Product published Date: This will be the X number of days counted from the date when the product was Published.
To enable this feature visit configuration >>> Product >>> enable “auto-disable product” >>> Enter value and save.

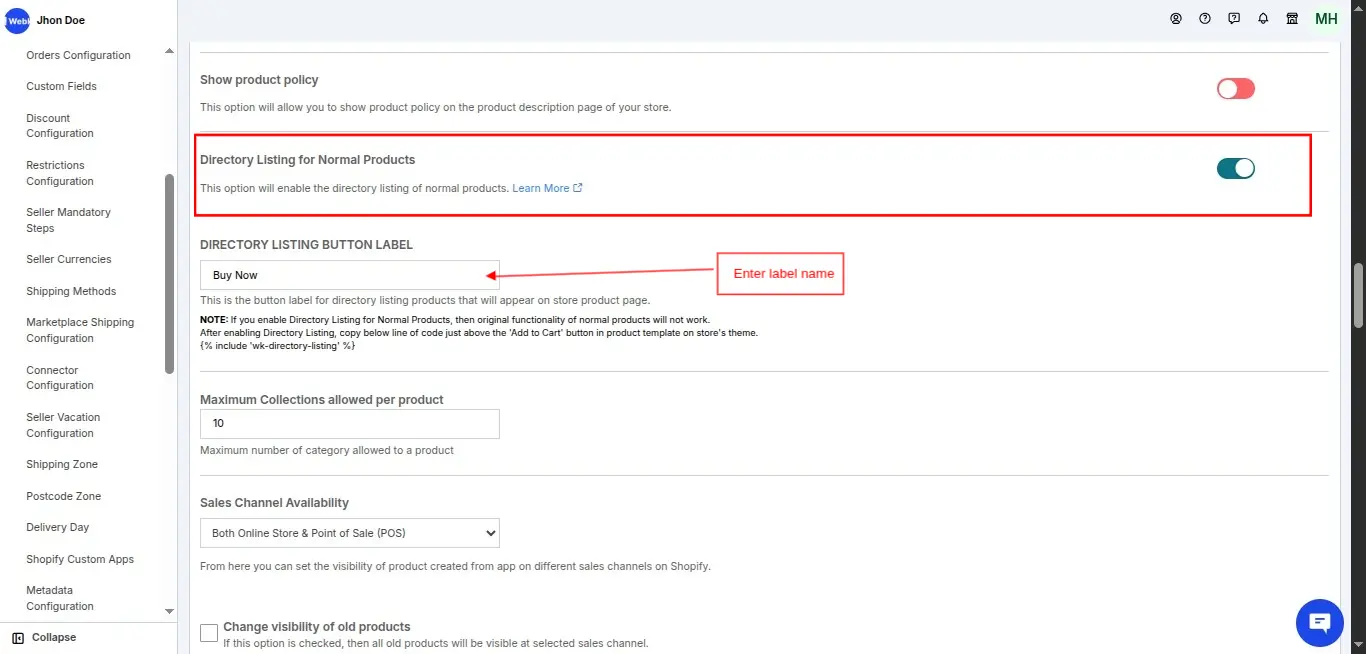
DIRECTORY LISTING
Multivendor App Directory Listing Feature for Shopify enables you as admin to convert the marketplace into a directory listing marketplace.
You just have to enable this directory listing feature, and then sellers can redirect buyers to their website. To enable this feature you will have to visit:
Configuration >> product tab >> enable directory listing >> enter the button label as per your wish and click on save. To know the full details click here.
ORDER PREPARE & FULFILLMENT STATUS
**Step 1:
**To enable the functionality, refer to the below screen-shot

Go to Configuration >> Orders Configuration
**Step 2:
**Once an order is placed, the shipping status will set to “collect” at the seller side and “busy” at the admin side.

Step 3:
Now the seller will click the “collect” button for a corresponding order to notify the admin to collect the product. Here admin will receive an email regarding the same.
Now at the admin side, the shipping status of that order is in the “Collect” state and at the seller side, it’s “Pending”.


**Step 4:
**Once admin clicks the “collect” button for an order, the status changes to “collecting” at both sides.

**Step 5:
**Now the admin collects the product, to notify the seller he clicks the collecting button. Here the status changes to “collected” at both sides.

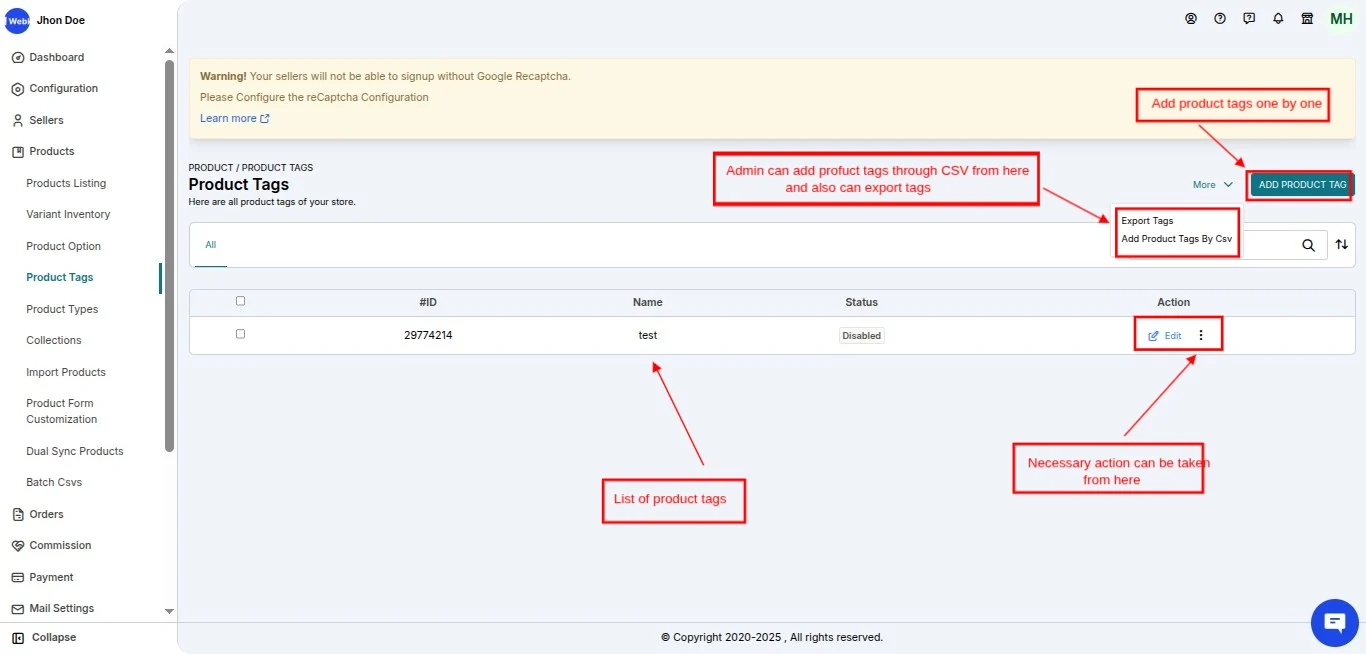
ADD PRODUCT TAG BY CSV
In the Multivendor Marketplace app, Admin can now add the product tags in bulk by uploading the CSV file.
For this admin first, we need to enable the “Restrict Product tags” button from the “restriction configuration” menu of the app.
Admin panel of multivendor app>> Configuration >> Restriction Configuration >> Enable “Restrict product tags” >> Save changes.

Now visit the Product tags section of the multivendor app and from here add the product tags in bulk by uploading CSV.
Admin end of multivendor app >> Products>> Product Tag s>> More actions >> Add product tag by CSV.
ADD PRODUCT TYPE BY CSV
In the Multivendor Marketplace app, Admin can now also add product types in bulk by uploading CSV.
For this admin first, need to Enable the “Restrict Product Type” button from “Restriction Configuration” section of the app
Further, visit the Product types section of the multivendor app and here add the product types in bulk by uploading CSV.

C2C MARKETPLACE: ADD TAG TO CUSTOMERS
In the C2C Marketplace, You can display a “Seller Portal” button on the customer’s “My Account” page clicking on which your valuable customers will be converting into sellers on your Marketplace.
Now, we have added an option to add Tag to Customers who become sellers from the Seller Portal button.
- So, go to the General Configuration Menu of Multivendor App.
- Scroll down & Enable C2C Marketplace Feature.
- Enable Add Tag to Customer Tab.
- Further, Enter a Tag for your customer.

After adding the tag, as soon as the customer becomes the seller on your marketplace, you can view this Tag for the customer from the Shopify backend in the Customer section.

ADDITIONAL FIELDS FOR SELLERS TO MANAGE PRODUCTS
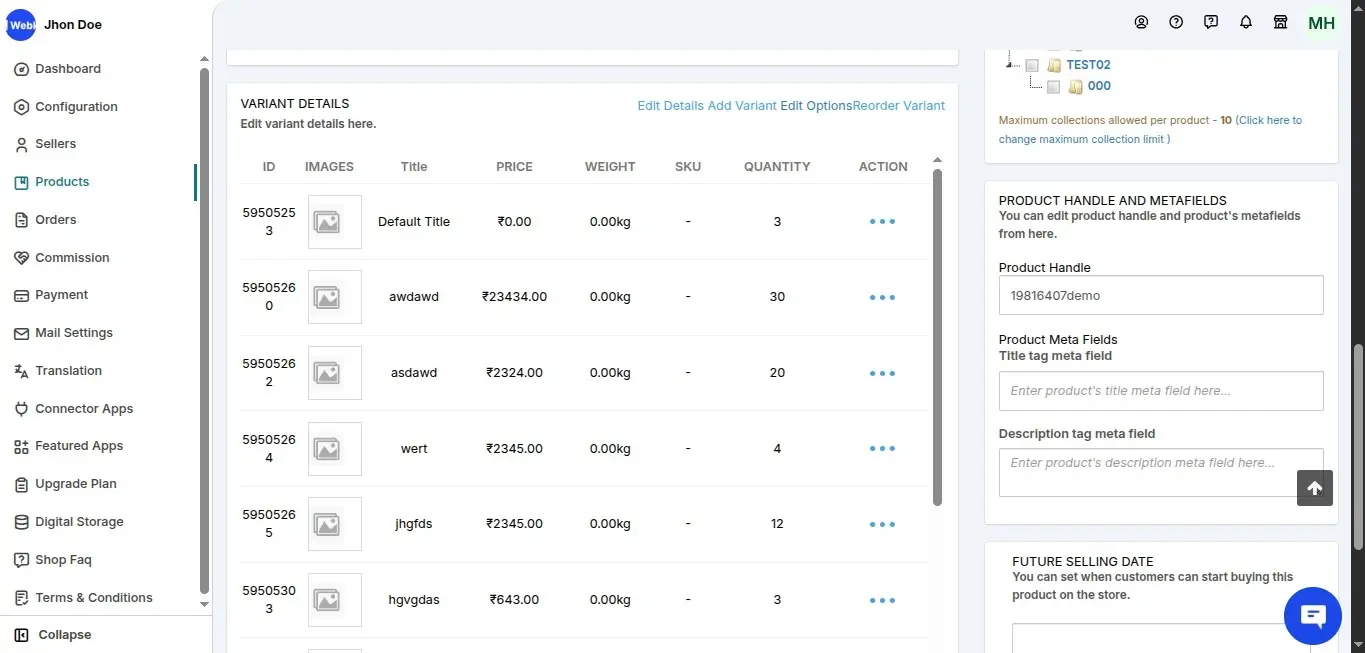
ALLOW SELLERS TO ADD PRODUCT HANDLE & META-FIELDS
In the Multivendor App, you can now allow sellers to add Product Handle and Meta Fields while adding or editing any product from their respective seller panels.

This is how these fields will display on the add product page (Seller Panel > Products > Product Listing > Add/Edit Product).
ALLOW SELLERS TO DISABLE PRODUCTS
Also, you can now allow your sellers to disable products from the Product Configuration menu of the app.

RESTRICT PRODUCT FORM FIELDS FOR SELLERS
If you want to allow Your sellers to edit only the Product Price & Inventory while editing any product and restrict the rest of the fields then,
You can disable the “Allow Sellers to Edit Product” tab and enable the Tabs to manage Product Price & Inventory.
- Go to the Product Configuration.
- Disable the “Allow Sellers to Edit Product” Tab.
- Enable/Disable “Manage Price” & “Manage Inventory” Tab as per the requirement.
- Also, save the Settings.

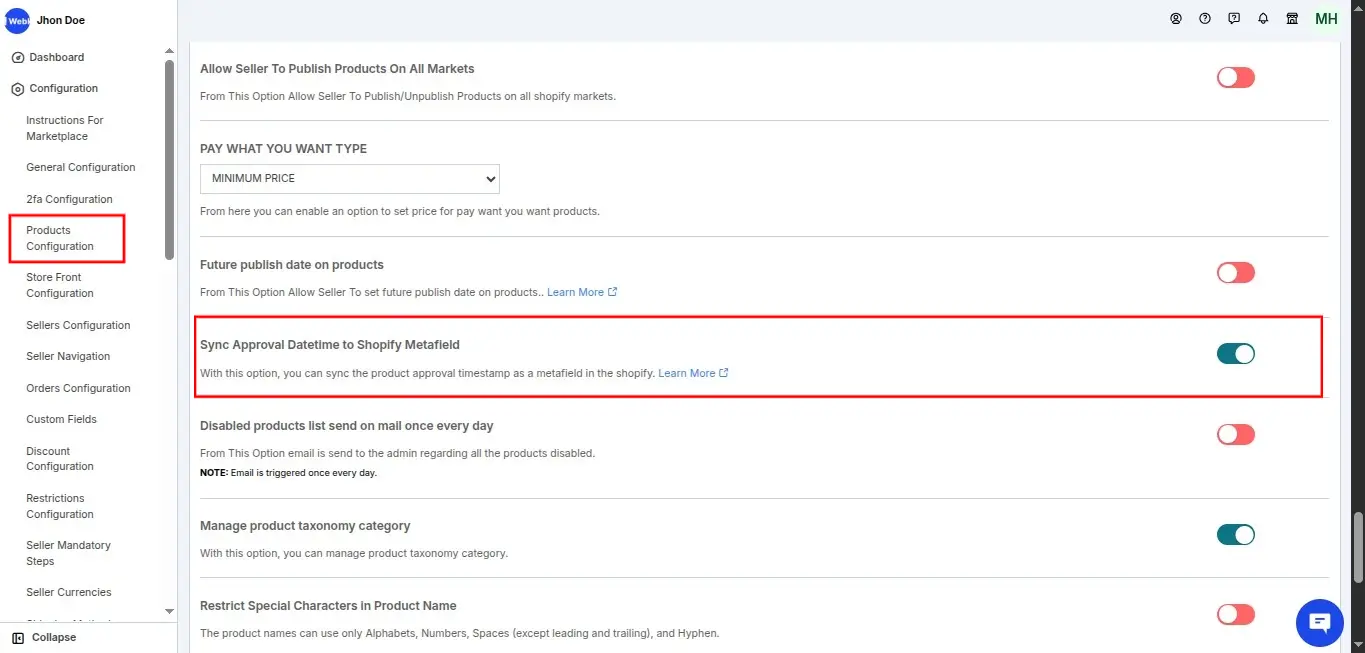
SYNC APPROVAL DATETIME TO SHOPIFY METAFIELD
When the admin enables the "Sync Approval Datetime to Shopify Metafield" configuration and approves or creates a product,
a metafield named "Webkul Product Published Date" is added to the Shopify product page, storing the timestamp value.
However, when the product is disabled, this meta field is updated with a "null" value.

To enable Admin need to navigate to the Admin panel of the marketplace >> Configurations >> Product Configurations>> Enable Sync Approval Datetime to Shopify Metafield.
SELLER NAVIGATION
Above all, introduced the Seller Navigation menu in the Multivendor admin panel using which You as an admin can manage menus of Your Seller’s Dashboard.

Furthermore, refer to this Blog of Ours to know about this Feature in Detail: Multivendor Marketplace for Shopify: Manage Seller Menus
min will now have the access to login seller dashboards directly from your admin panel.
Firstly, you need to enable the option from the General Configuration menu of the app.
Multi-vendor admin panel >> Configuration >> General Configuration >> Enable Option >> Save Changes.

Once enabled, visit the Seller Listing section and click the “Login as Seller” from the Action menu.
So, go to Multi-vendor Admin Panel>>Sellers>>Seller Listing>>Click Login as Seller (Action menu).

Furthermore, clicking this button, the seller will be redirected to the respective seller panel.
UPDATE PRODUCT VENDORS IN SHOPIFY
Now, the admin can choose whether he wants to update the Product Vendor in Shopify with Seller Store name or not.
In other words, if the Admin enables this option from the product configuration then the Seller name is updated at Shopify end whenever a product is created or updated at Multivendor.
So, to enable this option, visit Multi-Vendor Marketplace Admin Panel > Configuration > Product Configuration:
For instance, let's take this case: In the above screenshot, the first product is added when the ‘Allow Seller Name to Update on Shopify Store‘ option was disabled.
So, as you can see, the Vendor Name at Shopify end says ‘demo-store’ (the name of the admin’s store).
Whereas the second product is added when the following option was enabled, in this case, the Vendor Name is ‘Seller 1’ (name of the seller selling this product).
Minimum Purchase Amount for Orders
You can now allow sellers to set a minimum purchase amount for orders. That is, using this feature, you can restrict purchases for customers if the checkout condition is not satisfied.
The customer can proceed to checkout only when the cart amount is greater than or equal to the minimum purchase amount set by the seller.
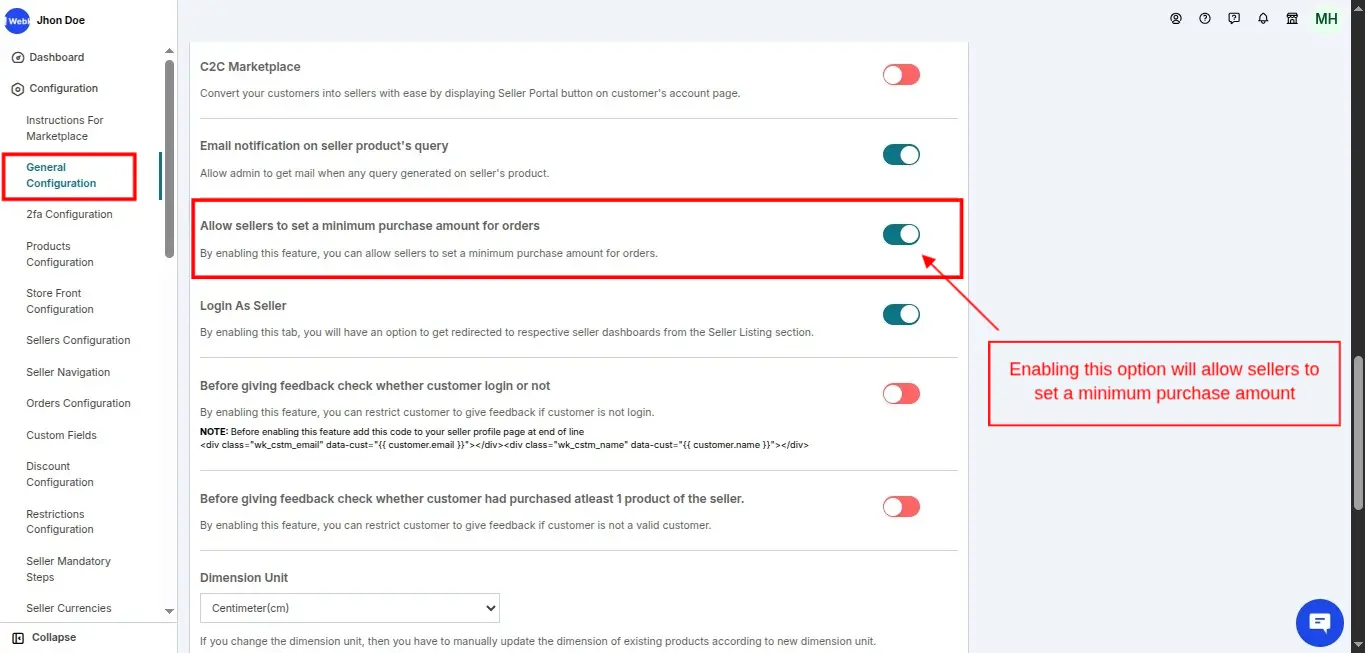
All you need to do is just visit the General Configuration section of the app and enable the tab.
So, as soon as you enable the “Minimum Purchase Amount” tab, the same will reflect at the seller side in the General Configuration menu.
That is, sellers can set a minimum amount required for the customers while purchasing products.

Now, only when the cart amount reaches the “minimum purchase amount”, the customers can proceed for checkout.
Else, the customer can either add more products to cart or increase product quantity so that the cart amount can reach the minimum purchase amount & he can easily proceed for checkout.
Let’s understand it with an instance:-
Price of Product A: $500
Price of Product B: $1000
Minimum Purchase Amount: $600
- Customer A adds Product A to Cart worth $500– FAILED TO CHECKOUT (as Product Price($500) < Minimum Purchase Amount ($600))
- Customer B adds Product B to Cart worth $1000–CHECKOUT SUCCESSFULLY (as Product Price($1000) > Minimum Purchase Amount ($600))
In order to display the checkout conditions on the Cart page, you need to add the codes to the suggested liquid files (as shown in the screenshot).
So, go to Multi-vendor Admin Panel and then
Configuration >>Instruction for Marketplace >> Scroll down to get the codes for “Seller’s Minimum Purchase Amount for Orders” >> Copy the code from there & add it to the instructed liquid files.
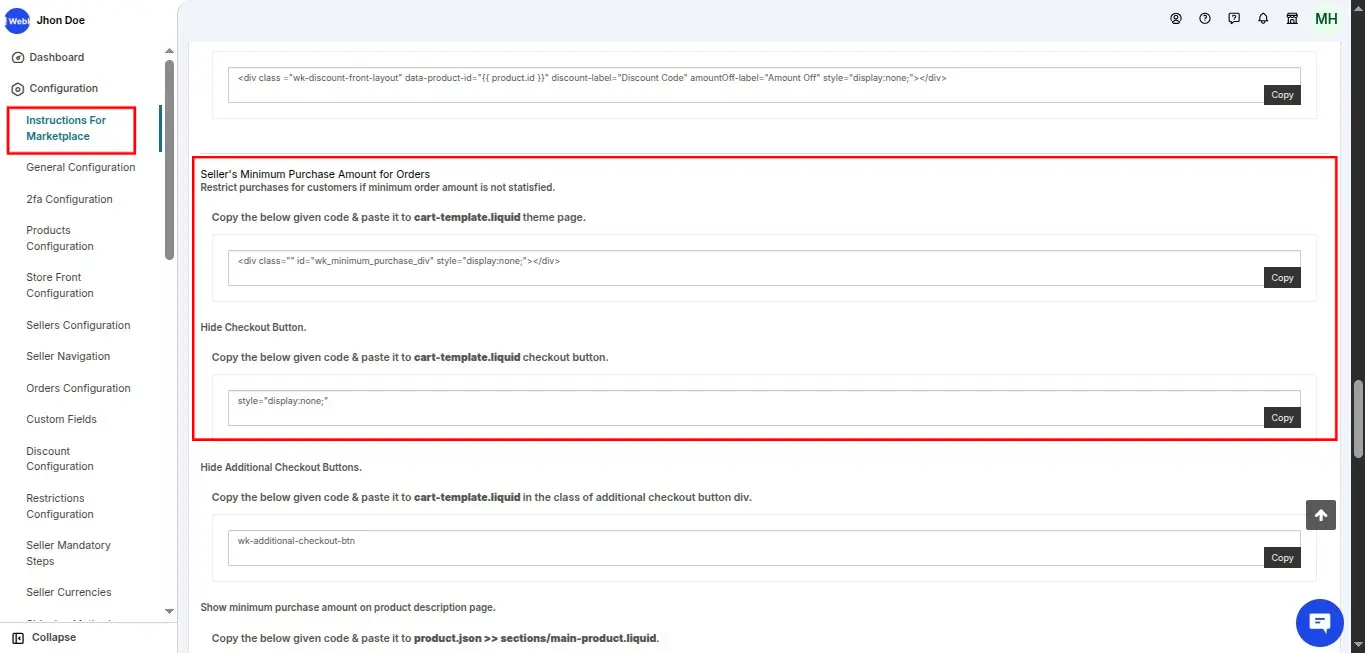
Once you add the codes to their respective liquid files, this will be the visibility of the cart page (Refer below screenshots).

In short, if the cart amount is equal or greater than the minimum purchase amount, the customer can proceed for checkout.

MANAGE DEFAULT TRACK PRODUCT INVENTORY
In a multivendor marketplace app for Shopify, while adding a product either from seller panel or admin panel, the INVENTORY DETAILS is by default set to ‘don’t track inventory’ option.
Now, the admin or seller can also select it to ‘track’ manually for individual products.

Multivendor marketplace admin/seller panel > Products > Product Listing > Add Product
Now, if the admin wants the INVENTORY DETAILS to be by-default set to ‘Track’ then he can configure the same from the admin’s panel.
So, go to the multivendor marketplace admin panel > Configuration > Product Configuration:

Further, enable the following option to make the inventory of all the newly added products to be by default set to ‘track’.
ALTERNATIVE TEMPLATE FILE FOR SELLER PRODUCTS
Now, you can set a template for your seller’s product from the Product Configuration menu of the app.
That is, whenever a seller creates a product then that template will be assigned to the newly added product.
So, if you want to have the seller’s product designs different from the normal products then, this can be done effortlessly using the alternative template feature of the Multi-vendor app.
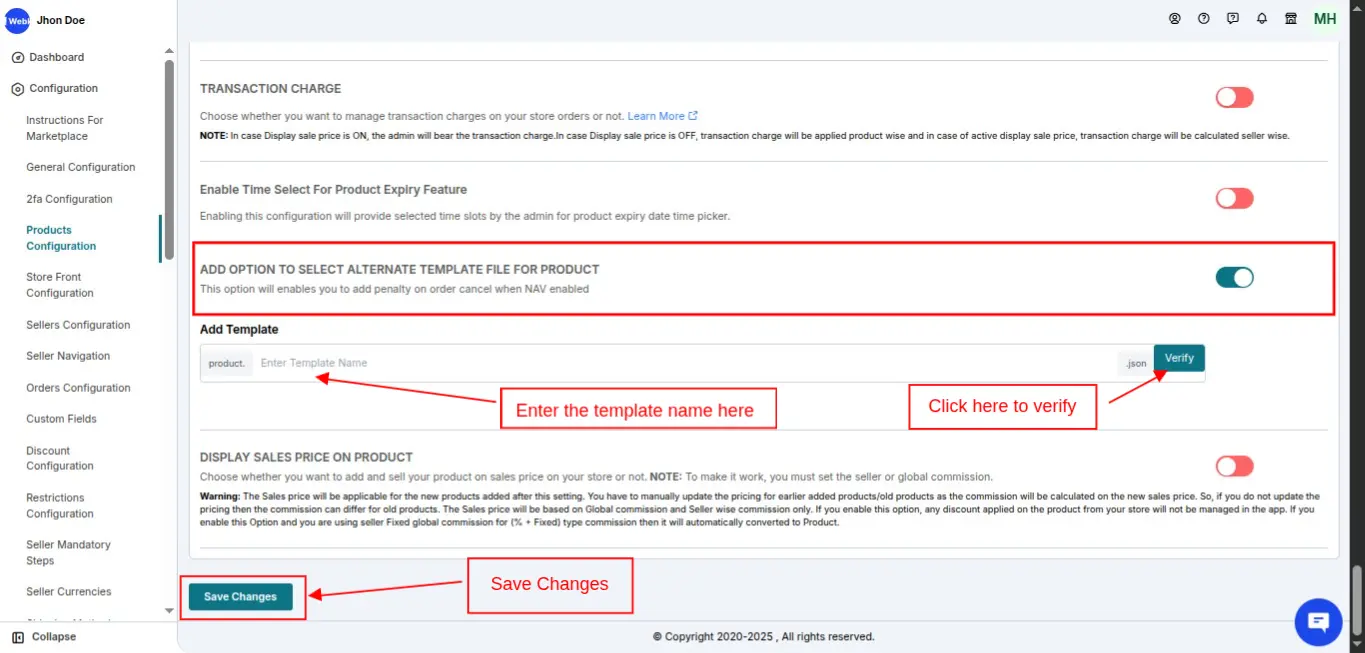
- First, Enable the tab.
- Enter the template name (make sure it is case sensitive).
- Click the Verify button.
- Once verified, submit it.
- Furthermore, save changes.
Note: Make sure you have an alternate template created at the Shopify admin end.
This will directly assign the mentioned template to the products once added by the seller.
Google Recaptcha Configuration
You can now add Google reCaptcha to the seller sign-up form.The seller sign-up form is a form that the seller needs to fill out once they register for your marketplace.
To add this option, you need to go to admin panel>> Configuration >> Google reCaptcha Configuration >> Enable the option.

Enable the tab and enter the Google reCaptcha site key & secret key. You need to contact Google to get the keys.

HOW TO GET reCaptcha KEYS:
- Visit the Google reCaptcha dashboard here
- Click on the V3 admin console

- Fill in all the details. (refer to the examples below)
Label: Any label for your indication (suggestion: seller signup )
reCAPTCHA type: v2 Checkbox
Domain: Your seller page domain without using https/ (for example: xyz.sp.seller.webkul.com)or your customized seller page domain (for example: seller.xyz.com)

You will get the keys after submitting the details. Please copy these keys and save them in the reCaptcha configuration section of your Multi-vendor admin panel.

This is how the Google reCaptcha appears on the seller sign-up form:

NOTE: If you have a customized seller signup page template. Please contact us at support@webkul.com with your reCaptcha keys so that we can set this up for you.
Select the language for reCaptcha
Now, while configuring the reCaptcha you can also choose the language in which you want the reCaptcha to be visible to the sellers during the signup process.

Sync Product price
Now admin can allow sellers to sync the product price with their store. This configuration is only applicable if the seller is using the connector app.
Admin can find this configuration on the edit Seller page.

Allow seller to send feedback notification to customer
Now, you can send automated emails to the customers for their feedback once you deliver or fulfill their order.
Furthermore, if the email has not been sent automatically, sellers will have the option to send these feedback emails automatically through their seller panels.
To enable this configuration, go to marketplace Admin panel > configuration > Order configuration > Enable "allow seller to send feedback notification to customer"

Once enabled, you have the option to choose the event as order delivered or order fulfilled.
Based on the selected events, the system will send the email to the customer. You also need to set the number of days after which the notification will be sent.
Note - 0 indicates the mail will be sent the same day.

Sellers can manually send these emails if the system does not send them automatically.
The sellers will have the option to send feedback e-mails for the order from their seller panels on the basis of the delivered or fulfilled status.

Note - The system will send the feedback email only once, based on the event (order fulfilled or delivered).
Sellers will have the option to send the email manually only if the system does not send it automatically.
It will appear as shown below if the email has been sent.

Feedback e-mail configuration
You will also have the option to configure the e-mail template of the feedback e-mail from the mail configuration section of the Marketplace Admin panel.

Note - If the status of the seller feedback notification is disabled, the option to send the feedback mail will not be visible in the orders in the seller panel.
Change the Copyright label of the app footer
Now, you can change the copyright label of the app footer, for this visit-
App admin panel>>Configuration>>General Configuration

NOTE- This feature is available only in the PRO plan of the app.
Restrict sellers from adding option names
In the Multivendor Marketplace app, Admin can now restrict the sellers from adding option names while adding a new product.
Sellers must select option names exclusively from the list of pre-approved product options added by the Admin
For this, first, we need to enable the “Restrict Option Name” button from the “restriction configuration” menu of the app.
Go to the Admin panel of the Multivendor app>> Configuration >> Restriction Configuration >> Enable “Restrict Option Name” >> Save changes.

Now, go to Products>>Product Option>>Add Product Option and add the option names that you want to be available for the sellers to choose from while adding a product.

Seller-wise auto-approve product
When you disable the auto-approve product configuration in the product configuration section of the marketplace Admin panel.

At the seller level, the option will appear to set whether the products will be auto-approved or not. By default, it will be turned off for every seller.
Then, the Admin can manually go to the seller edit section of the marketplace admin panel to enable this.

Manage product visibility for all sales channels & Markets
We now offer the option to list products on all sales channels and Shopify markets as soon as they are added to the marketplace panel.
For this, navigate to the marketplace Admin panel >> configuration >> product configuration >> Sales channel availability & allow sellers to publish products on all markets


Note - Disabling the product will result in its removal from all sales channels and markets.
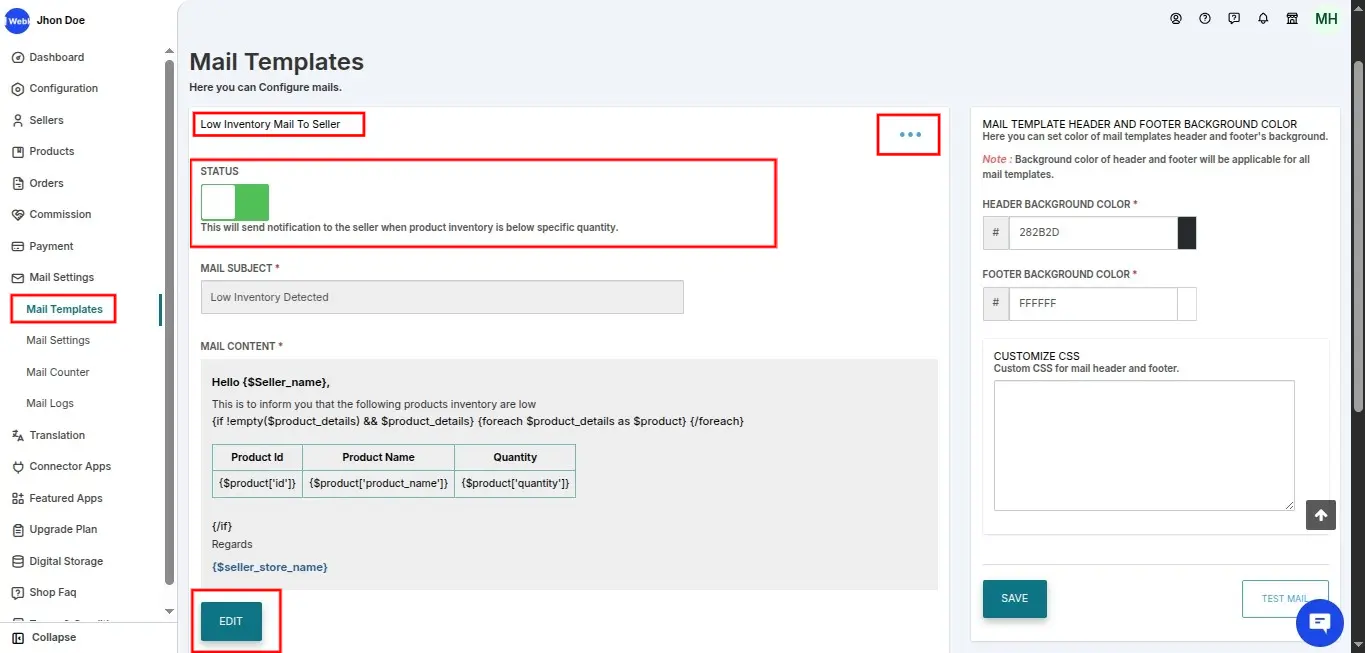
Send Email Notification To Sellers If Product Inventory Is Low
Now, you can enable the configuration to send email notifications to the sellers if the product inventory is low.
For this, visit the app's Admin panel>>Configuration>>Seller Configuration and enable the tab shown in the below image.

Once you enable the tab, the system automatically sends an email notification to the seller when the product inventory reaches the threshold limit you set.
The template for this email can be configured by navigating to Mail configuration>>Mail Configuration>>Click on the three dots(...) and choose the email template for low inventory>>Edit.
Future Publishing: Schedule products for publishing on Shopify
In the Multivendor marketplace app for Shopify, the Future Publishing feature lets sellers schedule when their products will go live on a shared storefront.
Rather than publishing a product immediately after listing it, sellers can choose a specific date and time for the product to go live on the marketplace.
For this kindly follow the below-given instructions-
Multivendor marketplace admin panel>> Configuration >> Products Configuration >> Enable "Auto approve products" and also Enable "Future Publishing Dates on Products" and Save.
For reference, the image below is provided:

After enabling and saving these settings, the seller or admin can schedule the products "Future Publishing date" at the time of the product listing.

When a future publish date is set for new products, they are created as 'Drafts' in the Shopify admin and are published on the storefront on the specified date.
Note: For products that were once approved but are now disable, the seller can set up a schedule.
However, products that have never been active can't be scheduled for publishing if auto-approval is off.
Admins and sellers have the flexibility to remove a scheduled publish date. Once removed, the product will be published on Shopify immediately.

Future Selling Date on Product
The Future Selling Date on Product feature in the Multivendor Marketplace app for Shopify allows sellers to schedule when their products will become available for purchase.
While the product will appear in the store immediately, customers will only be able to purchase once the scheduled date has passed, based on the time specified.
This feature helps sellers plan product launches and manage availability, ensuring that items aren't purchasable until the designated release date and time.
To enable the Future Selling Date feature, the admin should go to the Admin Panel, select Configuration, and enable "Future Selling Date on Products" under Product Configuration.

Once the Future Selling Date on Product configuration is enabled by the admin, sellers will have the option to set a future selling date while adding their products.
Whenever a future selling date is set for a product, both the seller and the admin receive instant email notifications.

Note: To view the configuration field on the product edit page, the 'Auto Approve Product' option must be enabled for products with a future selling date.
When a seller sets a future selling date for their product in the Multivendor Marketplace Seller panel.
The product will appear on the front end of the store, along with the date on which it will be available for purchase.

Prefix on Product Title
This feature enables the addition of a prefix to product titles. When activated, the specified prefix will automatically be applied to the product titles.
To enable this configuration, navigate to the marketplace Admin panel >> configuration >> product configuration >> Enable “ add prefix on product name”
Refer -

By default, the prefix is set to {$pid} which is the unique product ID for the product.
The admin has to option to edit it and use the prefix of their requirement.
Now, once the product is added the prefix option will show up.

And once the product is added the product ID will be added and it will show up in the product.

The prefix value along with the product name will be synced to Shopify.

"Mark As Sold" on the Action menu under the product listing page for both the admins and sellers
Both admins and sellers can now mark products as 'Sold' directly from their dashboards.
To do this, navigate to the product listing page, click on the three-dot menu next to the desired product, and select the 'Mark as Sold' option.

If you mark your product as "Sold", its inventory will automatically be set to 0. This means the product will appear as "Out of Stock" to customers.
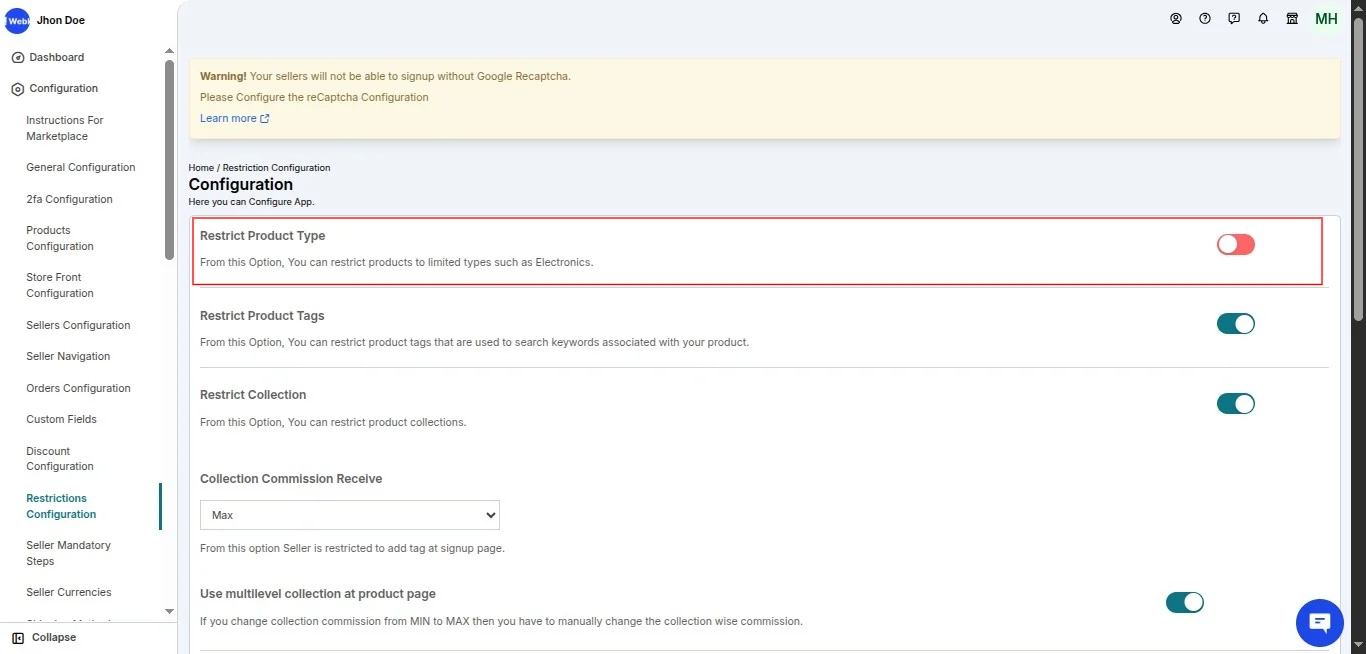
Restrict the Number of product images and tags on Product Type.
In the Multivendor Marketplace App, you can now set limits on the number of images and tags a seller can add to a specific product type.
To add a product type and tags, you have to enable the "Restrict product type" and "Restrict product tags" configuration from the restriction configuration.

To add product types, go to the Multivendor Marketplace Admin Panel >> Product >> Product Types.
Here, you can add product types, provide the necessary details, and specify limits for product images and tags.
Refer to the screenshots below:

You’ll also need to enable the configurations “Apply limitation on number of product images uploaded”,
and “ Apply limitation on number of product tags” from the restrictions configuration section of the marketplace Admin panel.
Navigate to Marketplace Admin panel >> Configurations >> Restrictions configuration >> Enable,
“Apply limitation on the number of product images uploaded”, and “ Apply limitation on the number of product tags”
Note: The configuration will only be displayed when the product type is enabled; otherwise, it will not be shown.
Refer to the screenshots below:


Now, once a seller adds a new product and selects a specific product type, the number of images and product tags selected for that product type will be restricted.
Note: The "upload image" and "product tag" fields will not be visible in the "add product" section until the product type is selected.


Restrict Seller to View Unpaid Orders
To restrict sellers from viewing unpaid orders, you can enable the “Restrict Seller to View Unpaid Orders” option.

Follow these steps:
- Log in to the Admin panel of the Multivendor App.
- Navigate to Configuration and select Order Configuration.
- Scroll down to locate the “Restrict Seller to View Unpaid Orders” feature.
- Enable the option by toggling it on.
- Click Save to apply the changes.
Once enabled, sellers will only have access to view paid orders. Until the order is marked as paid, it will not be displayed on the seller's dashboard.
Default Currency Symbol
This feature allows the admin to replace the default currency symbol displayed in the seller panel with a custom text/symbol of the admin's choice wherever the currency symbol appears.

To configure the default currency symbol for your sellers, the Admin needs to navigate to:
Admin Dashboard>General Configuration>Enable Custom Currency Symbol>Enter your Currency Symbol>Save changes.
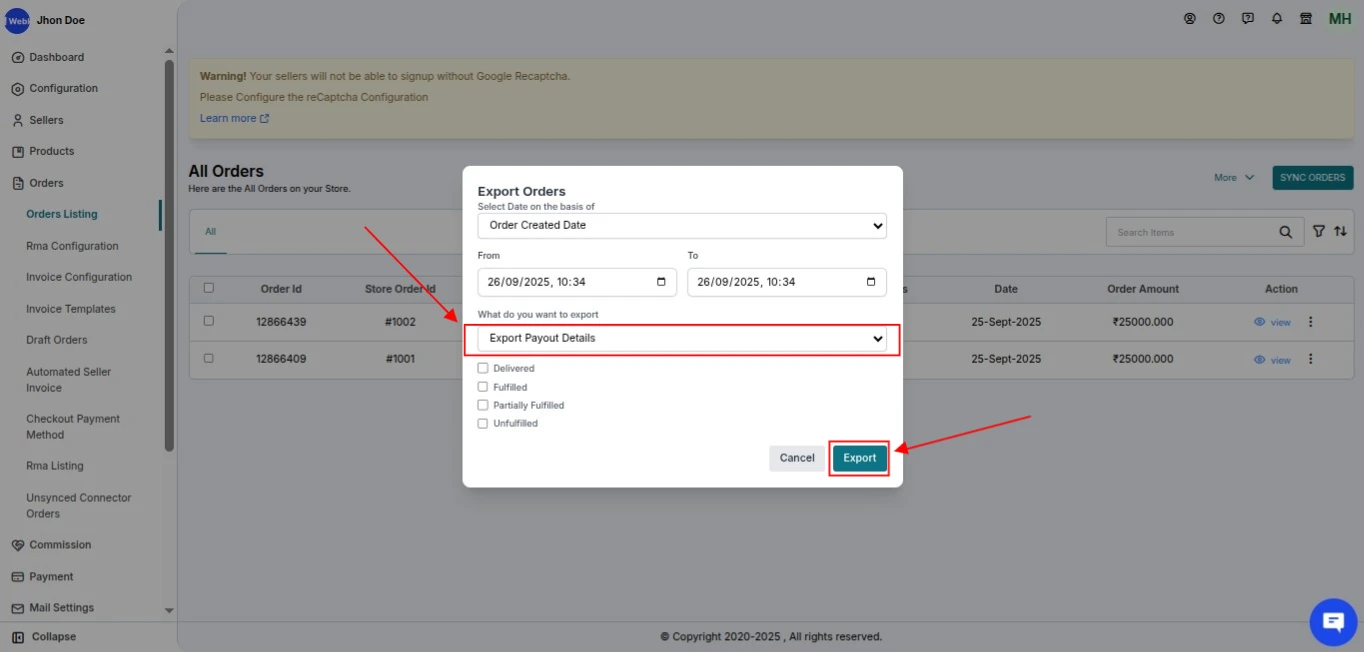
Export Order Payouts CSV
Admins can now export order payout details effortlessly.
To do so, navigate to: Admin Dashboard > Orders > Order Listing > Export Details.
Upon clicking Export Details, a form will appear. Simply enter the desired date range and select Export Payout Details to complete the process.
Google Translation For Admin And Seller Panel
We’ve added a new feature in our Multivendor Marketplace app that allows you to translate both the Admin and Seller panels using Google Translate.
With just one configuration, you can choose whether you want to translate only the Admin panel, only the Seller panel, or both.

To enable this feature, simply navigate to Admin Panel >> Configuration >> General Configuration and choose your preferred option.
Once enabled, a Google Translate dropdown will appear at the top-right corner of the selected panel(s).

From there, you can choose your preferred language, and the entire panel will be translated instantly.
This makes it easier for admins and sellers from different regions to use the app in their own language, offering a more user-friendly and accessible experience.
Note : This feature is not compatible with the Weglot Translation featured app. If Weglot is enabled, this feature will not function as expected.
How to change seller Email ?
To change the seller's email address, go to the Seller Listing page, click on "Edit Seller", then select the "More Actions" button and Change seller email .

Once you click on "Change Seller Email," a field will appear where you can enter the new email address.
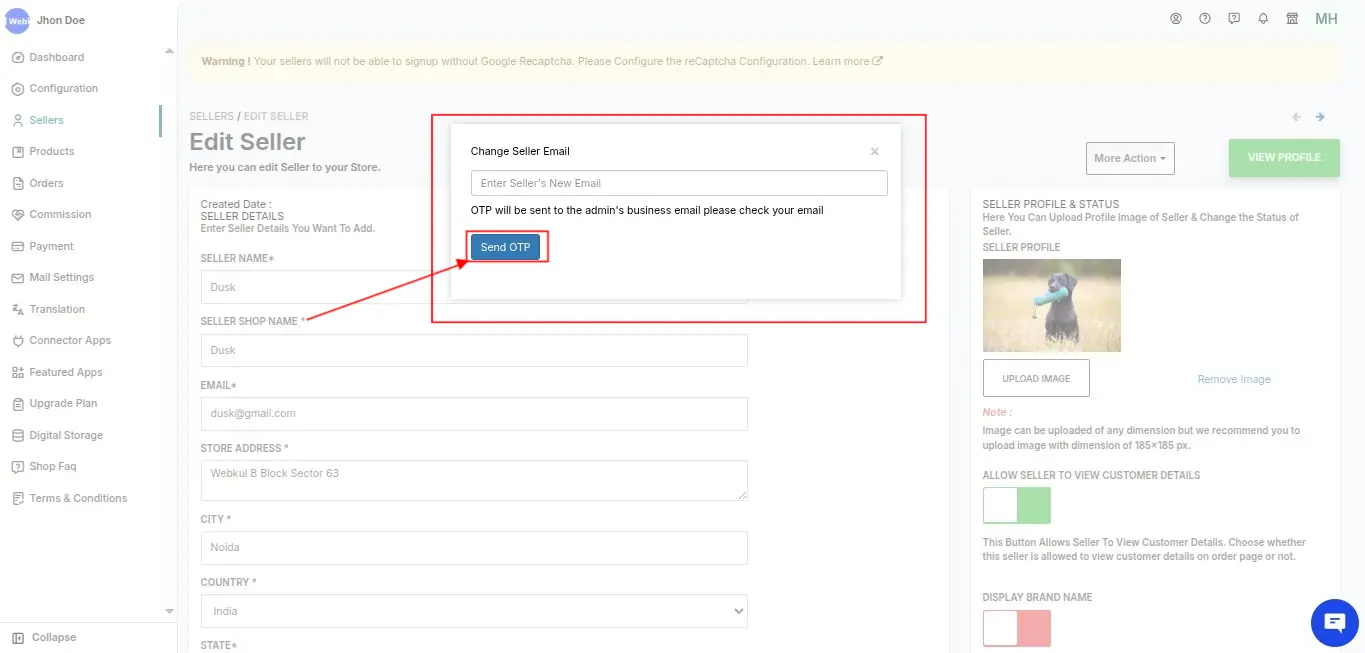
An OTP will be sent for verification to the admin store mail , and upon entering it, the email will be successfully updated.

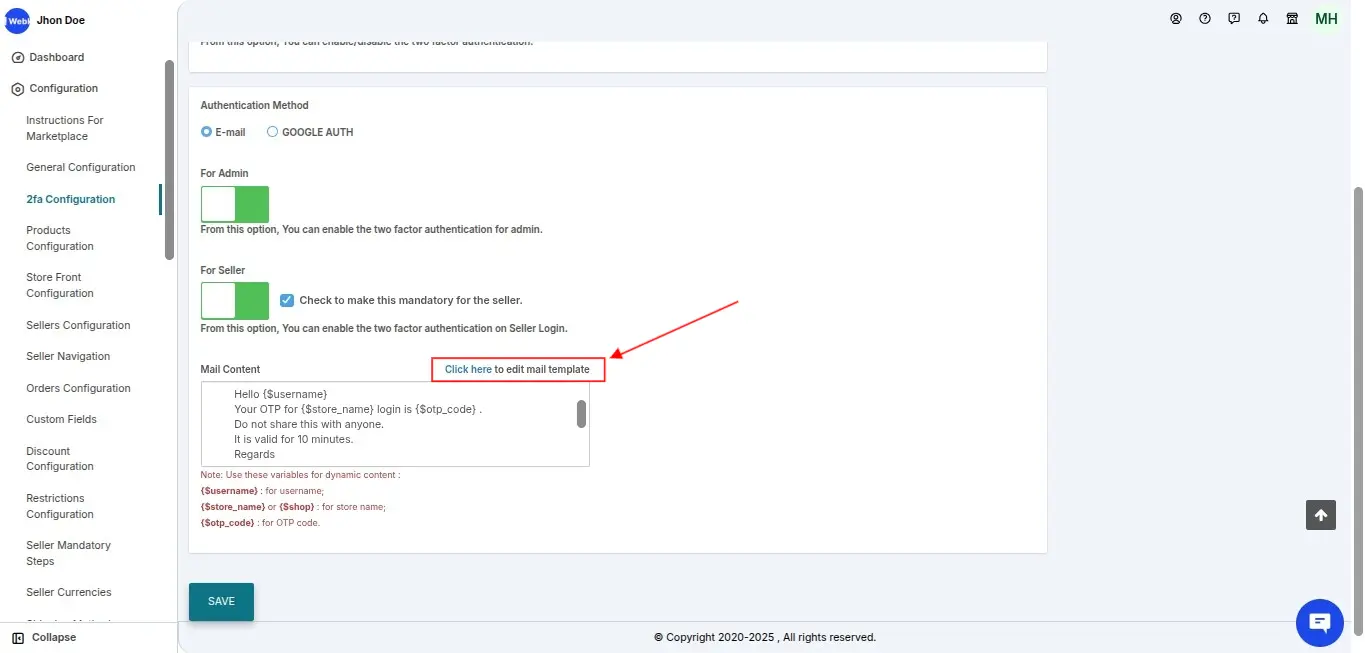
2-Step Authentication for seller and staff logins
To enhance security across the platform, we've introduced a 2-Step Authentication process for both sellers and admin users.
This added layer of protection ensures that only authorized users can access their accounts.
How It Works:
During login, both sellers and admins will receive a One-Time Password (OTP) via email. This OTP must be entered to complete the login process, effectively verifying the user's identity.
Admin Login Authentication:
By enabling the "For Admin" option in the settings, the admin will receive an OTP every time they log in. This helps secure access to sensitive backend operations.
Seller Login Authentication:
Admins can choose to enable OTP authentication for sellers as well. Once this setting is active, sellers will be required to verify their email using an OTP during each login.
If the checkbox is selected, this becomes a mandatory step for all sellers.

Customizable Email Templates:
Admins also have the flexibility to personalize the OTP email content. Simply click on the “Click here to edit mail template” link to customize the email according to your brand’s tone and messaging.
SMS Authentication

Users add an extra layer of login security by enabling SMS Authentication. During login, they enter a mobile number with country code and verify it using an OTP.

Once verified, a login code is sent to verified number every time you sign in, ensuring secure access with each login.

SMS Authentication only works when the Sms Alert feature app is configured.
There is also a feature for admin staff and seller staff login.
Note – If the seller changes the Contact no., he/she needs to verify the no. again at the time of login.
Google Authentication

The admin adds an extra layer of security by enabling the Google Authentication option and scanning a QR code with the Google Authenticator app during the first login.

Once linked, a new login code is generated in the app for each login, helping protect access to sensitive backend operations.

There is also a feature for admin staff and seller staff login.
Seller Internal Notes functionality
The Admin has the option to create and save internal notes for any seller. These notes are meant for internal reference and are only visible within the marketplace Admin panel.
Steps to Add an Internal Note:
Navigate to: **Marketplace Admin Panel → Sellers → Seller Listing
**Click on the three dots next to the desired seller and select "Send Message"

In the message window, compose your note and set the "Message Type" to Internal Note

Once submitted, the internal note will be saved and not visible to the seller. These notes are meant for Admin record-keeping and can be reviewed anytime from the Edit Seller section.


Save product as draft :
We have provided a configuration titled “Save product as draft” which, when enabled, allows both the Admin and the Seller to create products in draft status.
Users can schedule the products for publication at a later time.
To enable this setting, navigate to:
Multivendor Marketplace Admin Panel → Configuration → Product Configuration → Enable “Save product as draft”
Once configured, the system allows users to save products as drafts during the creation process:
Case 1 - Auto approve product is disabled.
In this case, only the Admin will have the option to enable the draft product
Case 2 - Auto approve product is enabled.
Both the Admin and the seller will have the option to enable the draft product.
Update the status to approval pending
To proceed, they need to edit the draft product, change the status to "Ready for Approval", and then click Save.
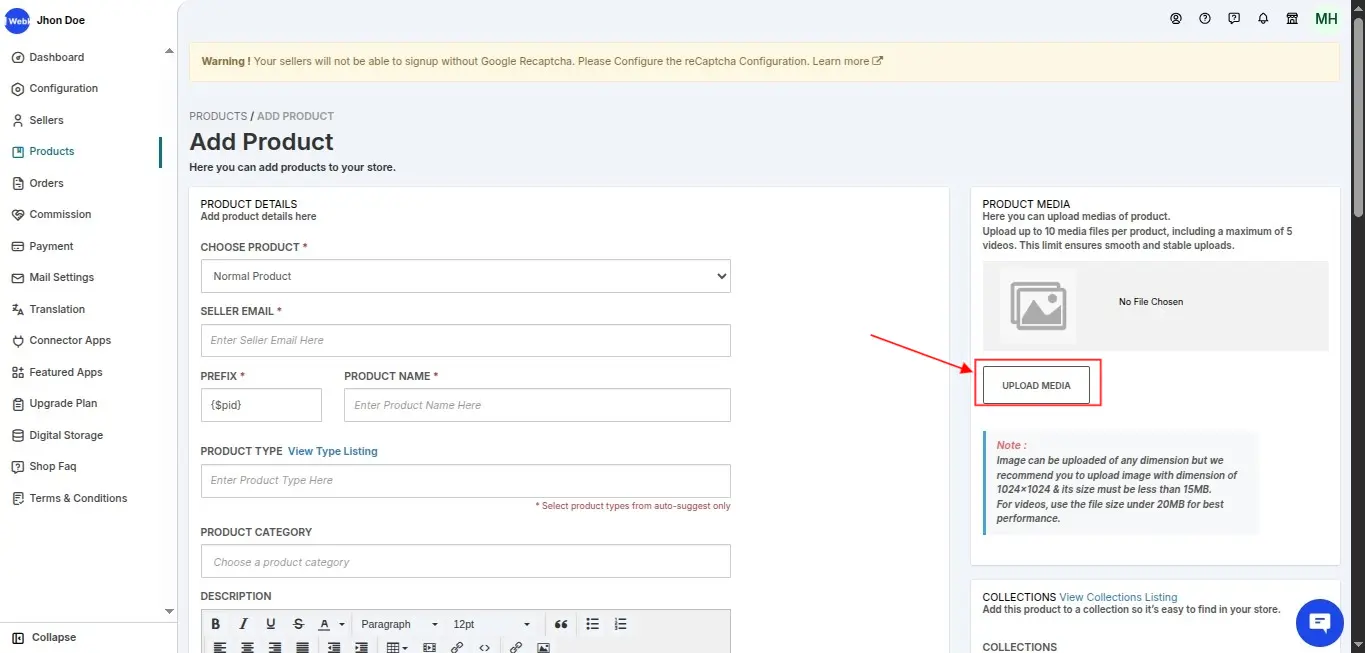
Video Upload for products
Now Video upload option is available in product add/edit pages.
It allows sellers and admins to showcase their products more effectively with engaging visual content.
To enable this feature, simply navigate to Admin Panel >> Configuration >> Product Configuration>> Enable Video Support in product media>>Pop message will appear for enabling>>Save changes
Upload Limit: You can upload up to 5 videos at a time.
File Size: Each video file can be up to 20MB.
Supported Format: Only .mp4 files are supported at this time.
Note: Make Sure Once You enable the video support in the product media option, you can’t disable it further!
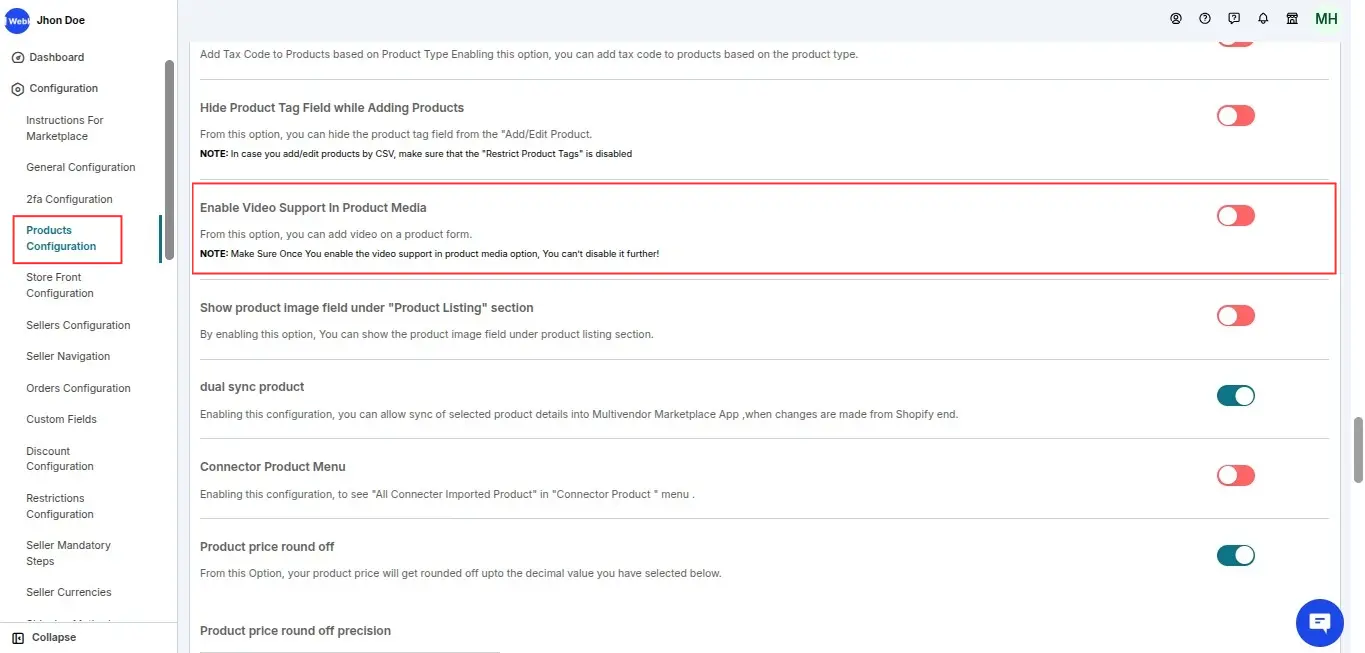
Before enabling the video upload feature, the system will show a warning pop-up message to confirm your action.
This ensures that users are aware of the file requirements and limitations before proceeding.

Now, both sellers and admins can upload videos directly from the Product Media section on the Add/Edit Product pages in Product listing.

Product Variant
Now, it is possible to add up to 2000 variants per product!
Previously, Shopify limited the number of variants to just 100 per product, which often created challenges for merchants managing products with multiple attributes like size, color, material, etc.
But with this significant upgrade, you can now offer far more choices to your customers without needing workarounds
Order listing in Seller Panel:
Previously, the Total Order Amount was only visible to the Admin in the backend panel.
With the latest update, this crucial piece of information is now also available to sellers directly from their seller panel.
Sellers can now view the Total Order Amount under the Order Section of their dashboard, just like the admin does.
This amount represents the complete order value placed by customers, including product prices, taxes, shipping, and other applicable charges.

Product Review listing on Seller Profile page:
Managing multiple sellers on a marketplace can get overwhelming especially when you want to make sure you're working with vendors who deliver great service and keep customers happy.
That’s why we’ve made a simple but powerful improvement to the Multivendor App: you can now view detailed seller profiles and customer reviews directly from the seller listing screen.
What’s New?
You can now quickly navigate from a seller listing to their store profile and view all customer reviews in one place.
Whether you’re trying to evaluate a new seller, follow up on a support issue, or simply monitor seller performance, this update makes it faster and easier.
Step-by-Step: How to Use the New Feature.
Open the Multivendor App
Go to Sellers > Seller Listing. This is where all your registered sellers are listed.Find the Seller You’re Interested In
Let’s say you’ve received a customer complaint and want to double-check that seller’s reputation.Click the Three-Dot Menu
On the right side of the seller’s row, click the three dots to open the quick actions menu.Select “View in Store”
This opens the seller’s public store view inside the app.Click on the “Reviews” Tab
Once you're on the seller profile page, switch to the “Reviews” tab to see all the customer feedback for that seller sorted and displayed in an easy-to-read format.


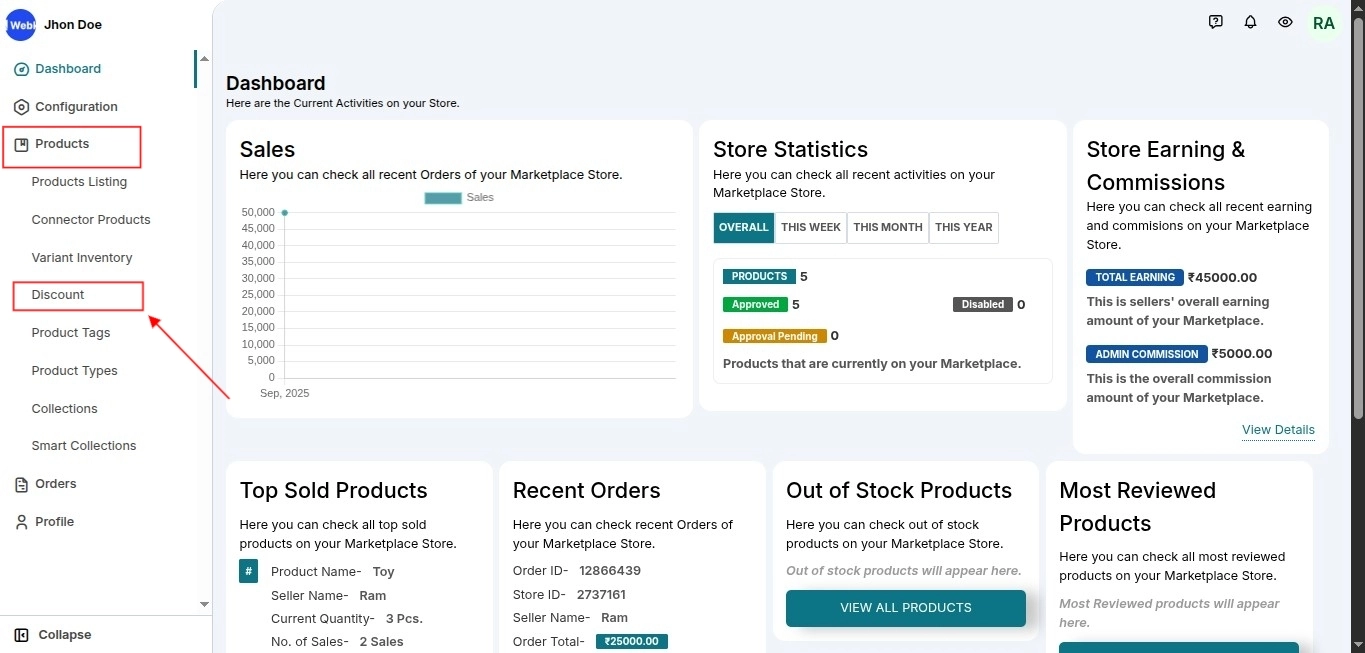
Discount
The Webkul Multivendor app now makes it easier for admins to empower sellers with discount management.
As an admin, you can decide whether sellers are allowed to create discounts directly from their dashboards.
Based on your configuration, sellers will be able to:
1- Create discounts on individual products
2- Create discounts on the overall order
Create Discounts On Products
The admin needs to follow the steps to create discounts on products.
Configuration: Admin End
To configure this feature, follow the path:
Admin Dashboard>>Configuration>>Discount Configuration
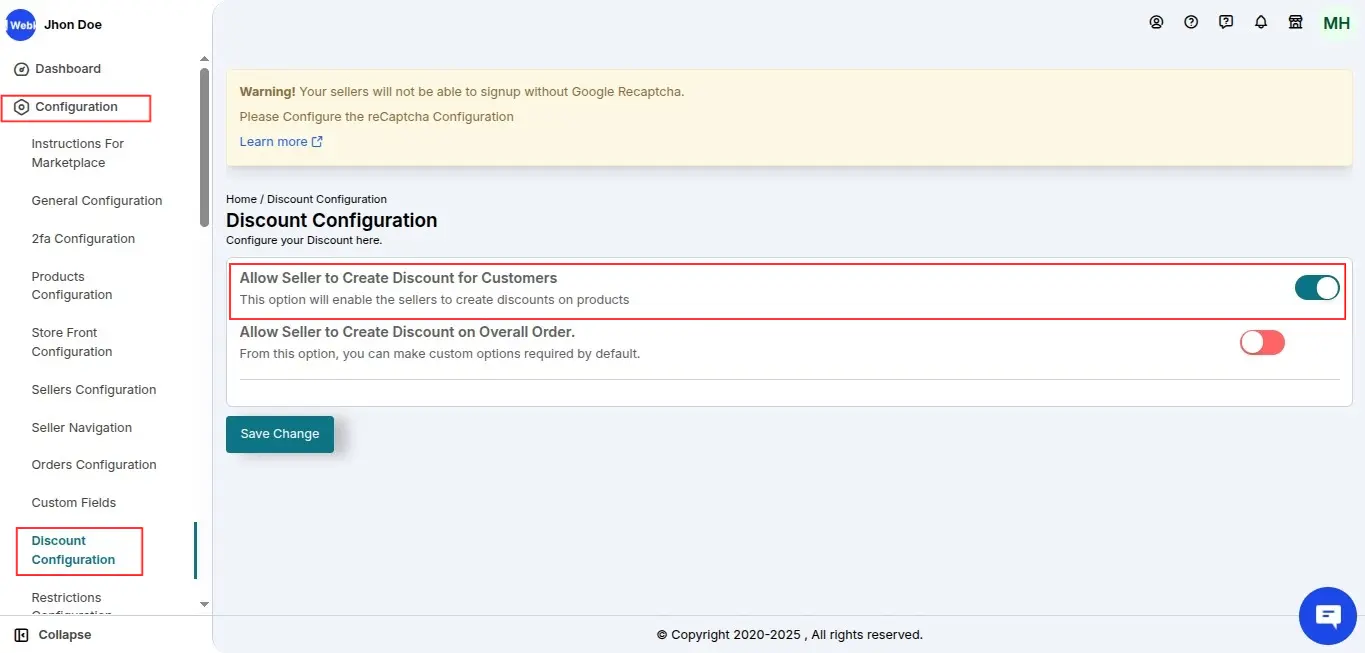
Click "Allow Seller to Create Discounts on Products" and save the settings.
As soon as the admin configures these settings, sellers will get the option to create discounts on products from their respective seller panels.
Seller Creating Discount on Product
The seller needs to follow these simple steps to add discounts to products:
Go to the Product section>>Select Discount >>Add Discount button.

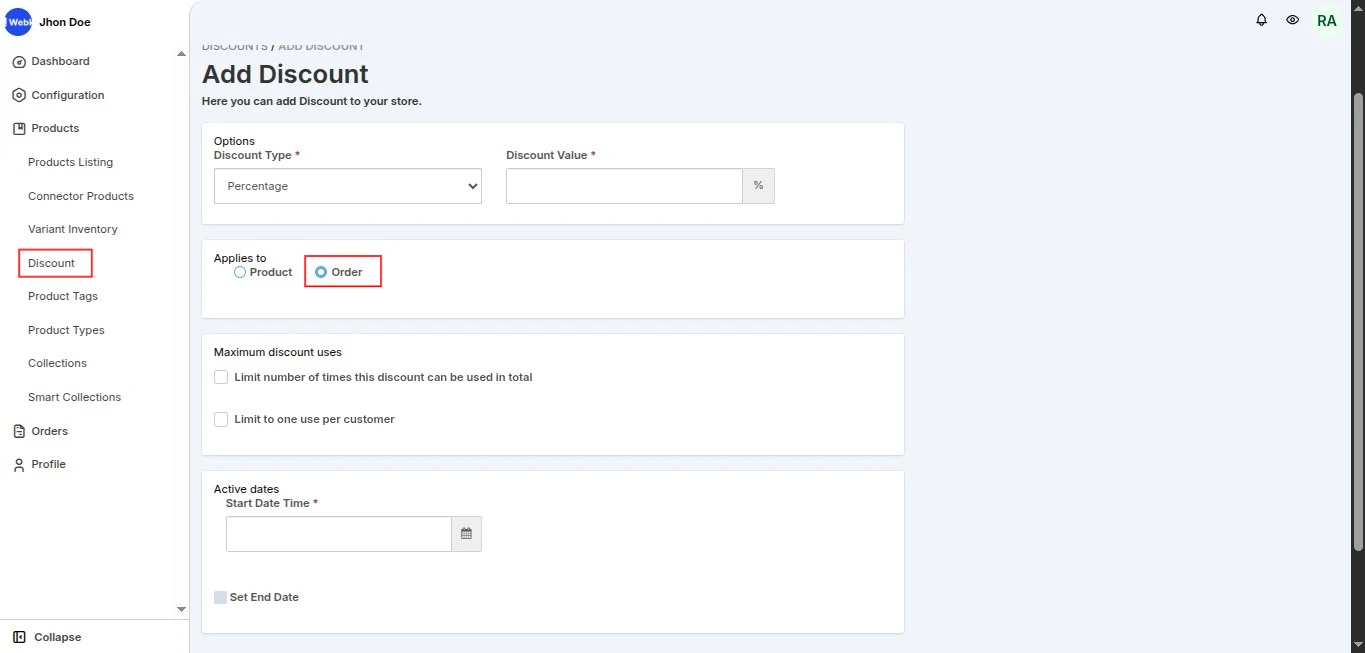
Select the discount type (Percentage or Fixed), enter the discount value, and choose the product to apply it to.
Set the start and end dates to define the validity period of the discount, then save changes.
The seller will see all the discounts added to their store in the Discount section.
Create Discounts On Order
The admin needs to follow the steps to create discounts on overall orders.
Configuration: Admin End
To allow sellers to create discounts on the overall order, the admin needs to navigate to:
Admin Dashboard>>Configuration>>Discount Configuration
Enable “Allow Seller to Create Discounts on Overall Order” and save the settings.

Once configured, sellers will have the option to create discounts on the overall order from their respective seller panels.
Seller Creating Discount on Order
The seller needs to follow these steps to create discounts on overall orders:
Go to the Product section of the seller panel.
Select Discount from the drop-down menu.
Click the Add Discount button.
Select the Discount Type (Percentage or Fixed) and enter the discount value. Select 'Order' as the discount applies to.
Set the start and end date of your discount as the validity period. Save changes.
The seller will see all discount codes added to their store in the Discount section.

Please note: The overall order discount works based on the seller’s smart collection, and the discount will also be applied seller-wise on the front end.
Discount Status
Scheduled: If the start date is in the future.
Active: If it has started but not yet ended.
Expired: If both the start and end dates have passed.
Front end
In order to display the discount on the front, you need to add the codes to the suggested liquid files (as shown in the screenshot).
So, go to the Multivendor Admin Panel and navigate to:
Configuration >>Instruction for Marketplace >> Scroll down to get the codes for “Discount” >> Copy the code from there & add it to the instructed liquid files.

In this way, the discount will be visible on the front.
